
New Features Sharpen Workforce Manager More Than Before
NEW FEATURES
· Save Form Draft to the System
Enhancements
· Use Current Client Values in Recurring Orders
· Form Module Settings History
· Excessive History Data Banner
· Scan and List fields in Search Conditions
· Custom List API Group Records by Row
· Custom Security Policy by Company
New features
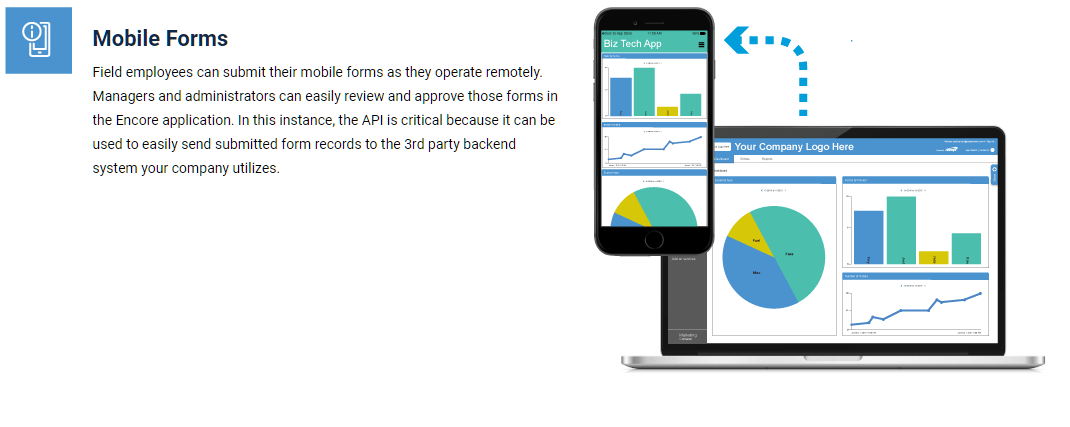
Our application allows users to create wireless forms seamlessly on mobile and web platforms. Users can fill out forms and submit them in almost real-time. As a step forward in enhancing the user experience, we are introducing a new feature that enables users to save a draft of their forms directly to the system. Additionally, web users will have instant visibility of the number of open form drafts and transfers.
Benefits
- Previously, mobile users could save a form draft and continue working on it later from the device it was saved on; with this update, web users can also benefit from this feature.
- This capability facilitates a seamless cross-device experience, allowing users to initiate a form on one device, save it to the server, and later retrieve it from another device.
- Server-based saving ensures data security and accessibility, reducing the risk of data loss associated with local device storage.
- Users can easily determine how many open forms they have by looking at the badge in the main menu.
Use Cases
A) ABC Inc. employees constantly travel and have asked us for the ability to start a form on the web app and finish it on the phone app and vice versa. Sometimes a worker will start working on a form in the field with their phone, but they don't get the chance to finish it. They want to be able to go back to their home or office and finish the form using the web application.
B) A customer’s technicians are using Surface Pro laptops. They log in to the web portal to fill out forms and would like the ability to save a copy of the form. When filling out a form in the web portal, the only options are to cancel or submit the form. Since this account is on a secure instance, the user will get locked out after 15 minutes of inactivity. This means that if a technician is in the middle of filling out the form and needs to attend another emergency, they may get locked out of the portal and lose all their form progress.
C) This customer would like to have a “save draft” option in the wireless form section of the web portal so they can save their progress and finish their forms later. This option is available in the mobile app, but it would be nice if this option was available in the web portal as well. They would also like a convenient way for users to manage and prioritize their pending form submissions, with a counter displaying the number of open forms.
Tier/s available: All, except Voice Dispatch
Training

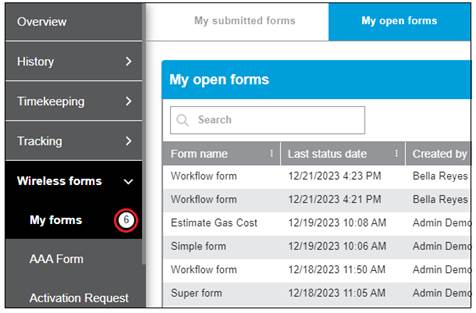
My forms
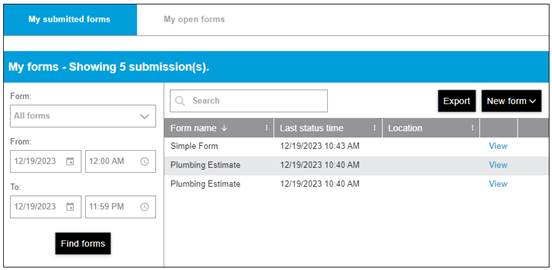
`
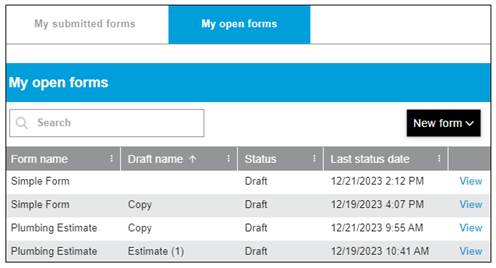
The second tab, titled My open forms, contains form drafts saved by the user:
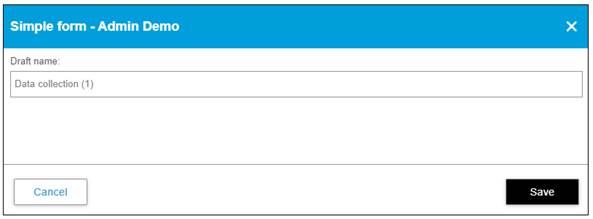
Saving a form draft

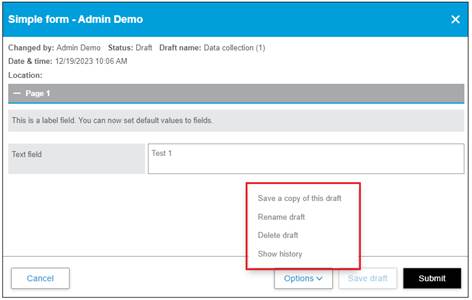
Once a web user is ready to continue working on an open form, the Options button contains a list of actions available. The list of available options includes saving a copy of the draft, renaming or deleting the draft, as well as showing a history of changes:
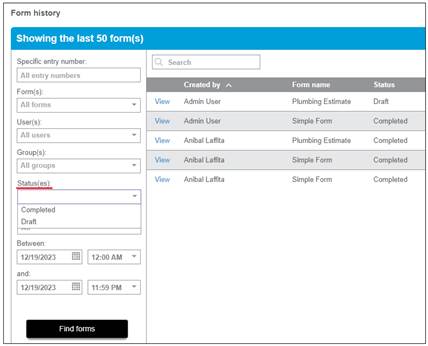
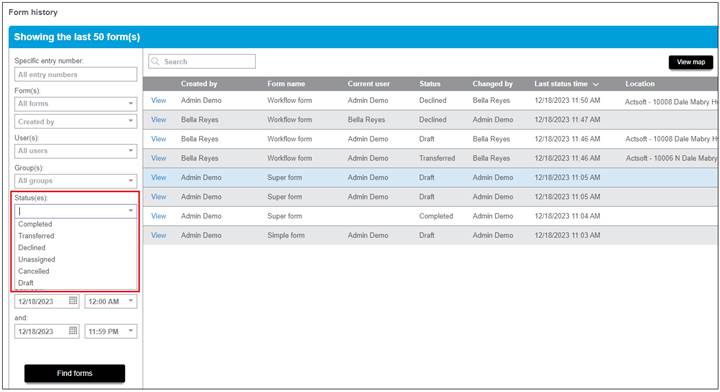
Form history
To better reflect Form Drafts in the form history screen, the Status parameter was added as a filtering option, allowing users to filter submitted forms by either Completed for Draft statuses.
Form workflow

The number of open forms badge
Another great addition is the new badge added to My forms in the main menu, showing the total number of open forms:
Additionally, when the Wireless forms section is collapsed, the badge shows next to the label:

*** note: the mobile app is not available yet to take screenshots for the different platforms***
We previously supported saving a form draft with a name in the mobile app and renaming an existing draft. With this new update, drafts are saved to the system when the device is in coverage.
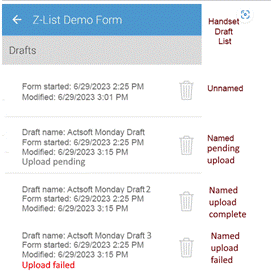
To help the user easily identify the draft they are working on, the draft name and modified time have been added to the header of the form in edit mode:

The drafts list has also been improved. It now displays the draft name, start time, modified time, and the transmission status indicating whether or not the form has successfully been uploaded to the cloud.
Form drafts for users accessing the Web and Mobile apps
Users that access both the web and mobile sides of the application will have the ability to start, modify, or complete forms started on a different device or platform.
Notes:
· Only the user who created the form draft will have the ability to edit or delete the draft from any device or platform.
- Form drafts are not available for Public Forms.
Benefits
· This option can be used to declutter mobile devices by removing unnecessary modules from the screen.
· All form-associated data is retained after the deactivation.
- Inactive form modules are easily distinguishable in the web application.
- Additional warning and confirmation in the module deletion process adds a layer of security to the module deletion process.
Use Cases
- A landscaping company has several form modules as part of its seasonal structure. Some forms are used throughout the year, while others are used depending on the season. As the business grows, some users find it confusing to have so many modules on their screens. To better organize their devices, they can now deactivate modules that are out of season and reactivate them when needed.
- A security firm utilizing our platform needs a way to unpublish forms that they previously created without losing the historical data associated with those forms. Previously, they would create a group and assign a form to it, while leaving the group with no members. This effectively made the form invisible, but this is not a viable option as it requires regular maintenance. Now they can simply deactivate the form they no longer need while preserving all its historical data.
- One of our customers requires the ability to separate and organize the modules screen by greying out or moving unused forms to a different section. Managing a large number of modules has become challenging, and manually navigating through numerous groups to remove forms from service is a time-consuming process with much room for error. The crew supervisor would find it easier if there was a way to easily unpublish modules.
Tier/s available: All, except Voice Dispatch
Training
Deactivating standalone form modules
The My Modules screen has been modified to support form deactivation. As long as there is at least one module set as inactive, the screen will be divided into two sections, the upper part will host Active Modules, and the lower will host Inactive Modules.
As a new rule, form modules have to be marked inactive before they can be deleted.
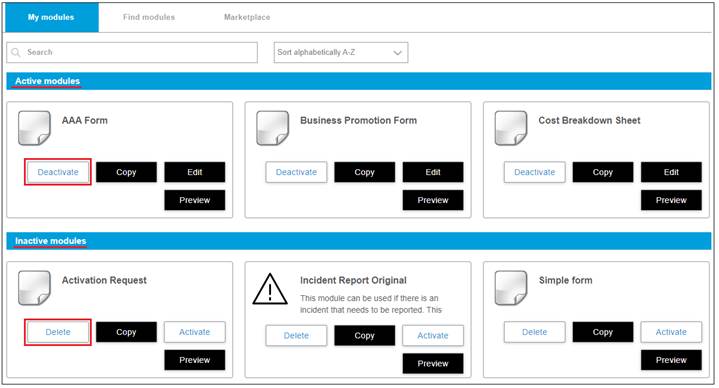
In sections of the web portal where users can select a form, like the Wireless Forms list in the main menu, all active modules will display first, with inactive modules following.

Deactivating a module
When deactivating a module, a warning box will populate requesting confirmation. Upon confirming, the module will be removed from all mobile devices and will no longer allow editing.

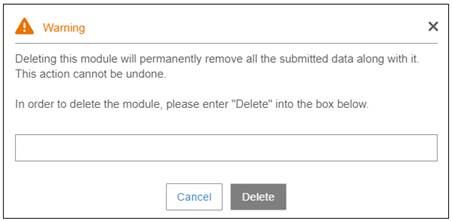
Deleting a module
In order to provide additional security, form modules must be inactive before deletion, and extra confirmation from the user is now required:
The mobile application
Once a form module is deactivated, it is removed from the list of modules on all mobile devices, and users cannot create new forms.
Notes:
- Any pending form submissions at the time of deactivation will be submitted to the backend when the device is connected to the network.
- If a form with a public form link is deactivated, users will be prompted by the same message as if the link on the form has been deleted.
- Existing form drafts will no longer be available on the mobile application. Instead, the draft will remain in the system as we now store drafts on the server side.
Tip: To submit a draft after a form deactivation, create a temporary group for the user, assign the form, reactivate, submit and
deactivate again.
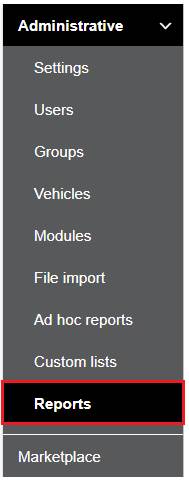
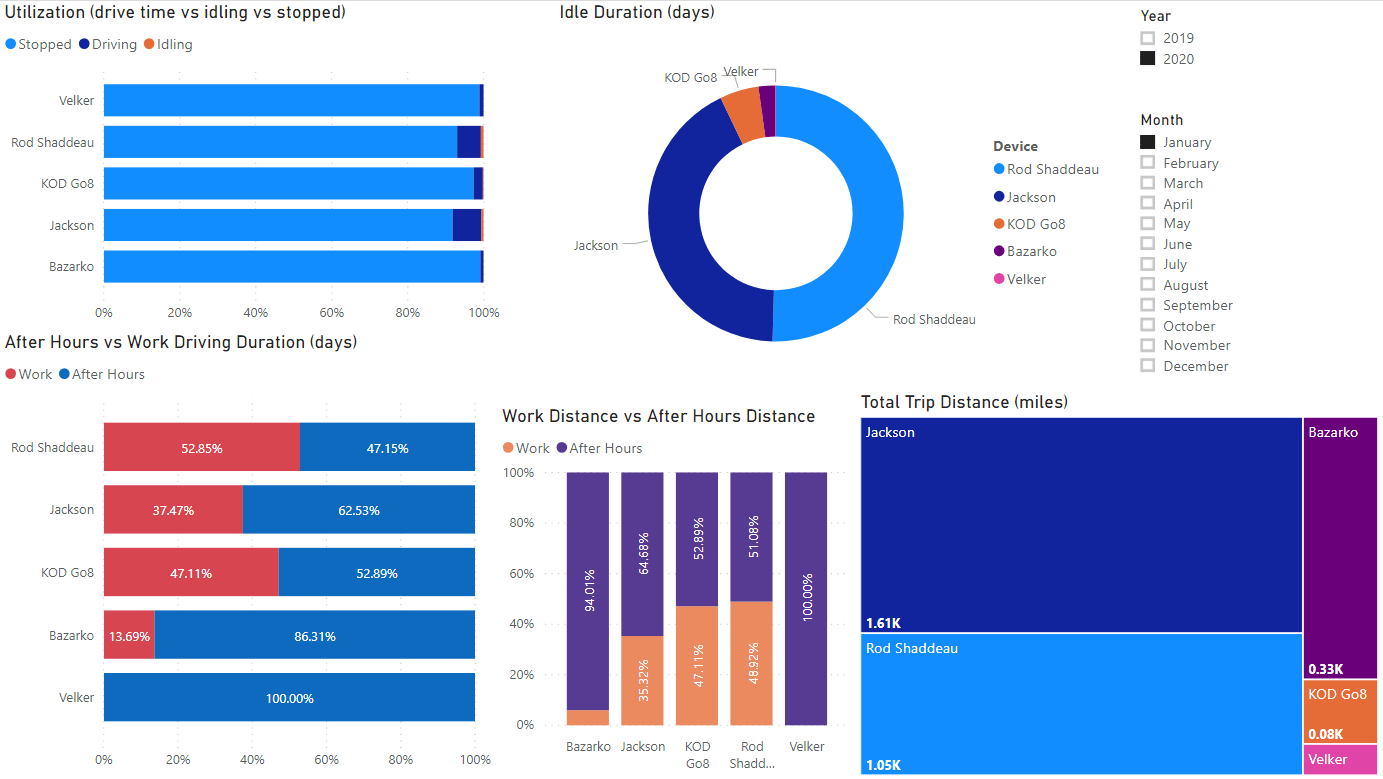
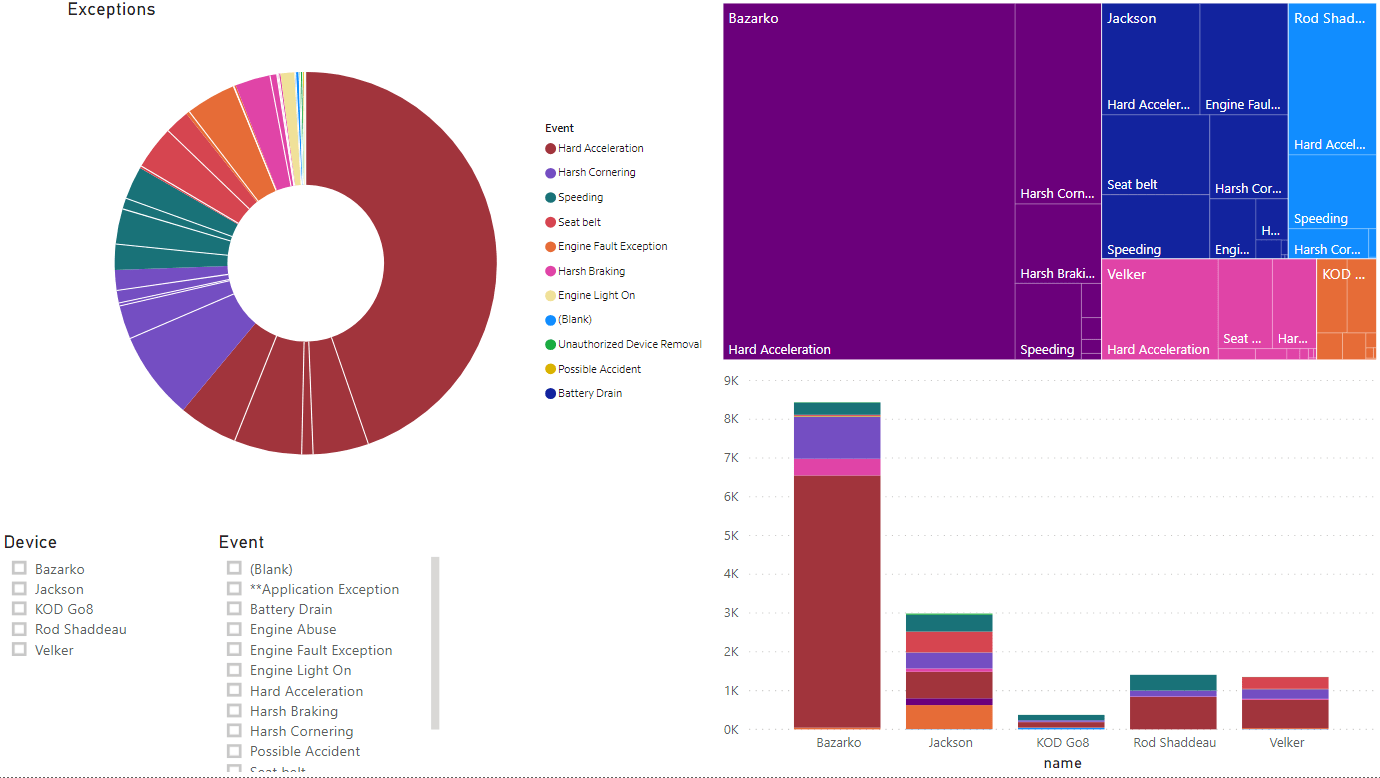
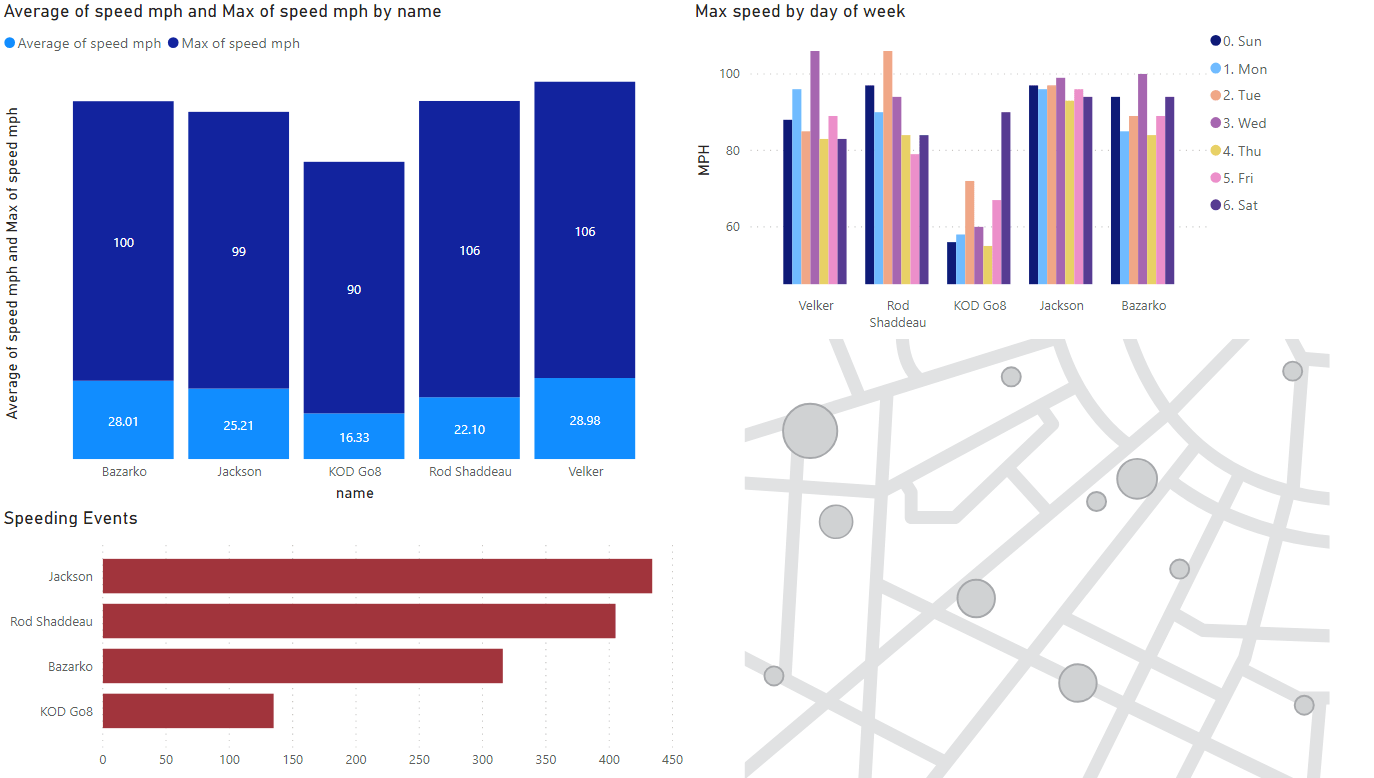
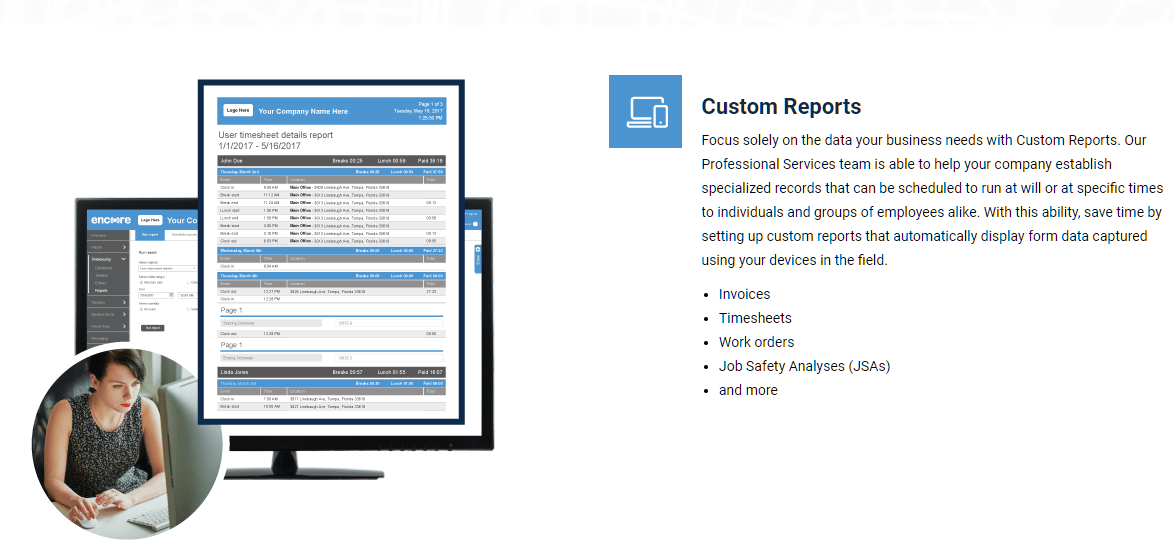
Businesses rely on reporting systems to gain a holistic view of their operations and for better decision-making. The new Reports option in the Administrative section of the web app enables users to run system reports not tied to one specific module or functionality. These reports offer valuable account-related information.
Use Cases
1) One of our largest customers wants to have better control over who is logging into the application and who is not. They would like to have a comprehensive report providing basic information for users, including login times for both Mobile and Web users.
2) ABC Inc. requires a way to monitor the latest activities performed by users in real-time. They want the ability to quickly obtain the latest timekeeping records, location transmissions, and form submissions without navigating through different sections on our platform or running multiple reports.
Tier/s available: All
Training
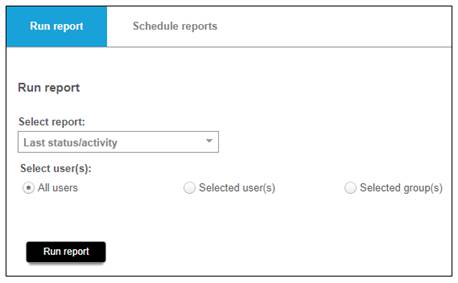
The new Reports section is located under the Administrative section of the web portal.
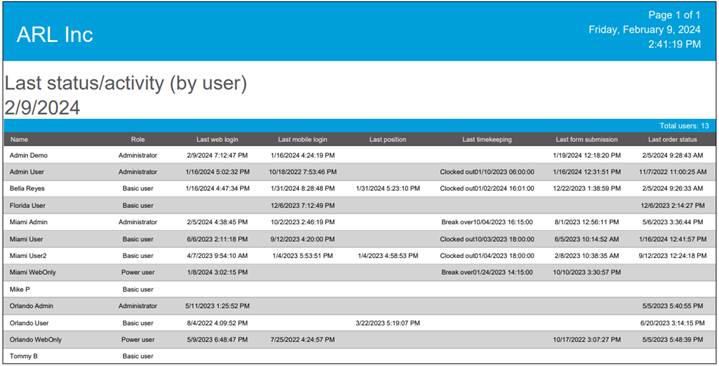
This report presents a summary of the last activities and statuses for every user in the account. The different parameters displayed are Username, User role, Last web login time, Last mobile login time, Last GPS position time, Last timekeeping record time including the record type, Last form submission time, and the Last order status time.
This report pulls login information for mobile and web users within a time frame. The data is grouped by user and presents a detailed list of the login session parameters, such as start and end times, the reason for the session termination, plus the type of access, as well as if it originated in the web or mobile app.
The report can be run for all users or selected users and groups:
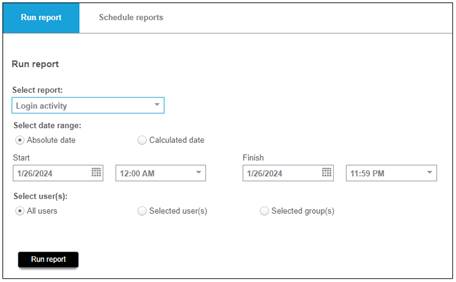

The IP Address column represents the IP address of where the authentication event was recorded. Public IP addresses are controlled by Internet Service Providers, therefore location results from IP Address lookup are not precise enough to be used to identify a specific physical address, individual, or for legal purposes.
Enhancements
This enhancement can provide a great benefit to customers utilizing recurring orders in our dispatching module. Currently, when client details fields are updated on the client side, manual updates are required for the recurring template to reflect the changes. Now our application is capable of using Current Client Values in Recurring Orders.
Use case
One of our customers manages hundreds of scheduled order templates. When they update client custom fields in the client profile, the recurring order templates do not automatically reflect the new values, instead creating orders with the old client values. Consequently, they must go into each individual recurring order template and update the client custom fields manually.
Benefit
The introduction of a simple checkmark saves valuable time that would otherwise be spent manually updating recurring order templates.
Tier/s available:
· Workforce Manager
o Enhanced
o Premium
· Workforce Manager Shield
o Enhanced
o Premium
Training
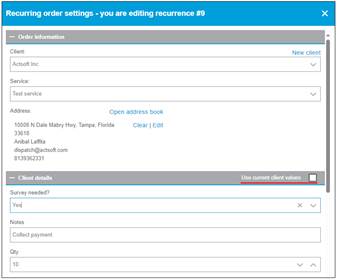
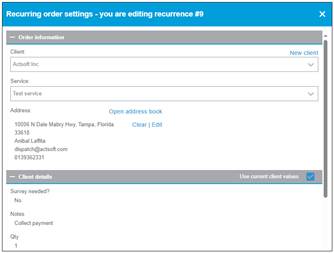
Note: Because the setting is configured for all fields in the client details form level, the only option is to use all values from the recurrence template or all values from current client values.
Form module settings history
Benefits
· This new feature provides a detailed list of modifications, adding more visibility and transparency over the multiple changes that can happen after module creation.
· It minimizes misunderstandings and allows stakeholders to quickly address issues resulting from changes made. This is particularly important when you have multiple system administrators.
Use cases
- Someone in the company made changes in the form builder of one of the modules. They removed a custom list and added new fields but did not inform the rest of the team. The customer reached out to us, wanting to know if there is a way to know who made the changes. This newly released feature recorded who made the changes, which allows them to revert it rapidly.
- ABC Inc. has expressed interest in knowing which member of their administrative team modified the Bus Inspection module and is wondering if an audit trail could be implemented. They have multiple people who access the portal as administrators and make changes and need a way to keep track of these changes and see what has changed.
Tier/s available: All, except Voice Dispatch
Training
The Show history button has been added to the bottom right of the Module settings screen:
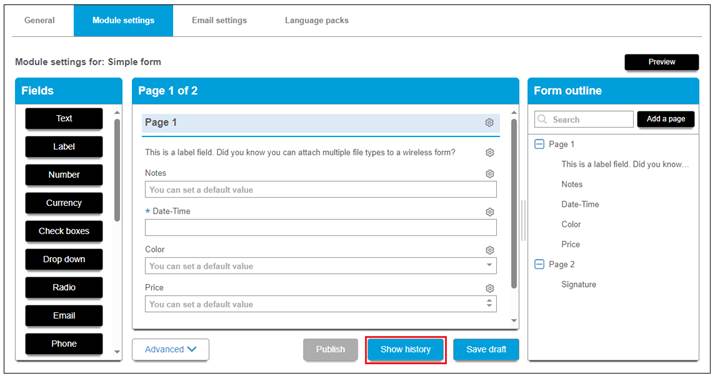
Changes are not reflected in the historical report until the form has been published.
Just like the rest of the Show history reports in our system, the report shows information in descending chronological order, arranged from the most recent change at the top to the oldest at the bottom. Each change record includes the name of the user who made the change plus date and time:
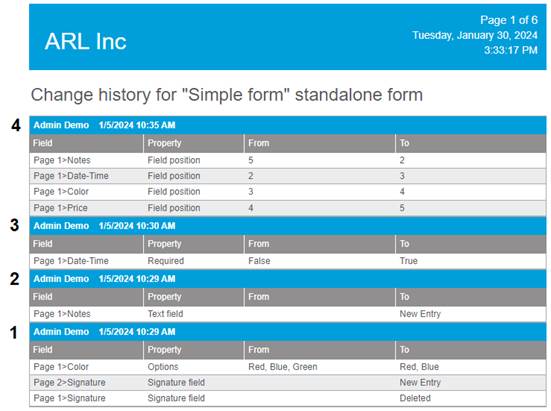
Description of report columns:
Field: Shows the form page number and field name modified.
Property: This is the property of the field that was modified. For example, the Date-time field in our example has a Required property that was changed from False (unchecked) to True (checked).
From/To: Displays the old and new values of the property. In change number 4 above, the user moved up the Notes field from the fifth position in the form to the second, as a result, the position of all the other fields changed as well.
More examples and considerations:
Change number 2 reflects the addition of the Notes field (New entry) as a new field to the form.
All changes made under the same Publish action are included in the same set, for example, change number 1 includes changes made to two different fields simultaneously. In this case, the value Green was removed from the Color drop down field, and the Signature field was moved from Page 1 to Page 2.
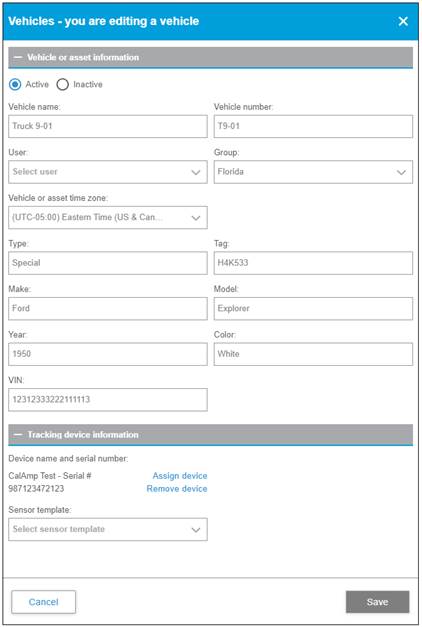
We continue to enhance the grids on our web platform to deliver an improved customer experience. The Vehicles grid has been revamped, featuring a brand-new layout that incorporates the latest development components. This update brings more capabilities, enhanced data manipulation, as well as improved performance, which will be appreciated by both our internal and external customers.
Benefits
· Additional vehicle-related fields have been incorporated as columns in the grid. This enables managers to view essential vehicle information quickly, aiding in organizing work, fleet management, and decision-making.
· Users can now export the list of vehicles in the account with just a click.
· Grouping by columns offers an effective way to present information on the screen based on user needs.
· Enhanced search functionality allows users to search for more vehicle-related fields, providing access to more relevant information.
Use cases
- One of our customers desires a way to export their list of vehicles into a report or document. They aim to compare the vehicles set up in the web portal with the vehicle list stored in Excel and associate created vehicles with untracked assets. They specifically seek information such as vehicle names, vehicle details, and serial numbers of the devices associated with each vehicle. The new grid will easily provide all the information they’re looking for.
- A fleet manager expresses the need to 'group by' vehicles based on the group, similar to the function available on other grids in our platform. This will facilitate a cleaner organization when managing vehicle profiles separated into multiple groups. While sorting is a lower priority, it is still a welcome enhancement.
Tier/s available: All
Training
The Vehicles tab
An Export button is located at the top right of the screen:
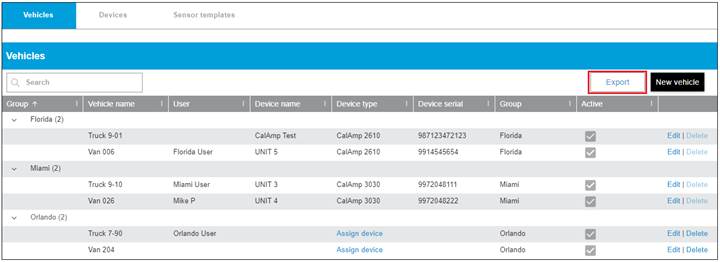
Groupable Columns:
· Device type
· Group
· Active
· Vehicle type
· Make
· Model
· Year
· Color
· Sensor template
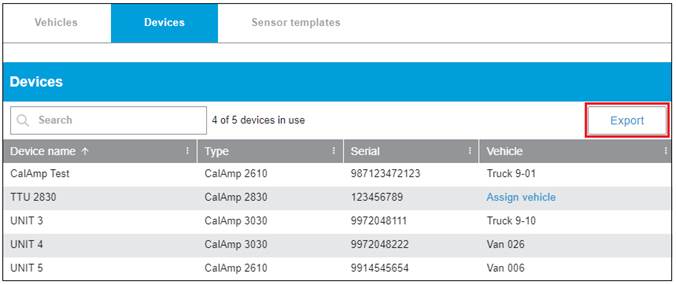
The Devices tab
Devices can be exported as well, and users can assign vehicles by selecting the Assign vehicle link.
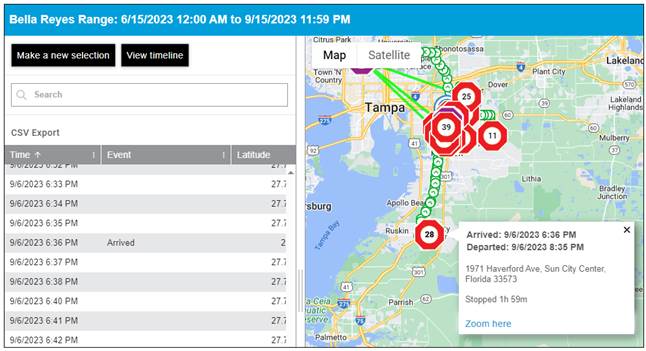
As a solution, we have implemented a banner that is presented on the screen when the system returns excessive data, advising users to narrow the time frame for optimal results.
Benefits
This enhancement provides users with a more reliable experience when searching for historical trip information.
Tier/s available: All
Training
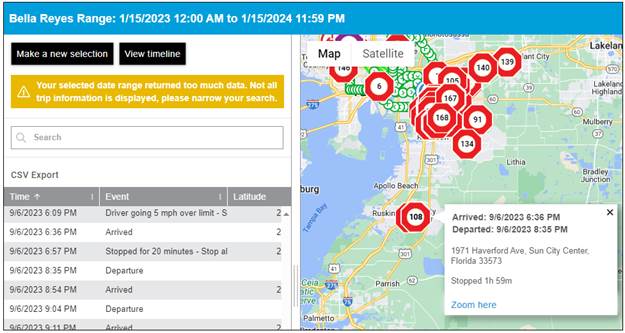
After searching for a shorter period, the same stop reflects the round-trip information:
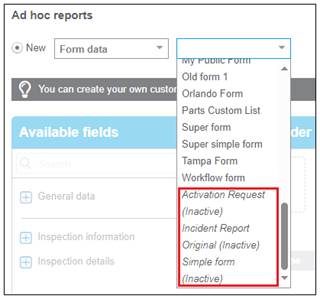
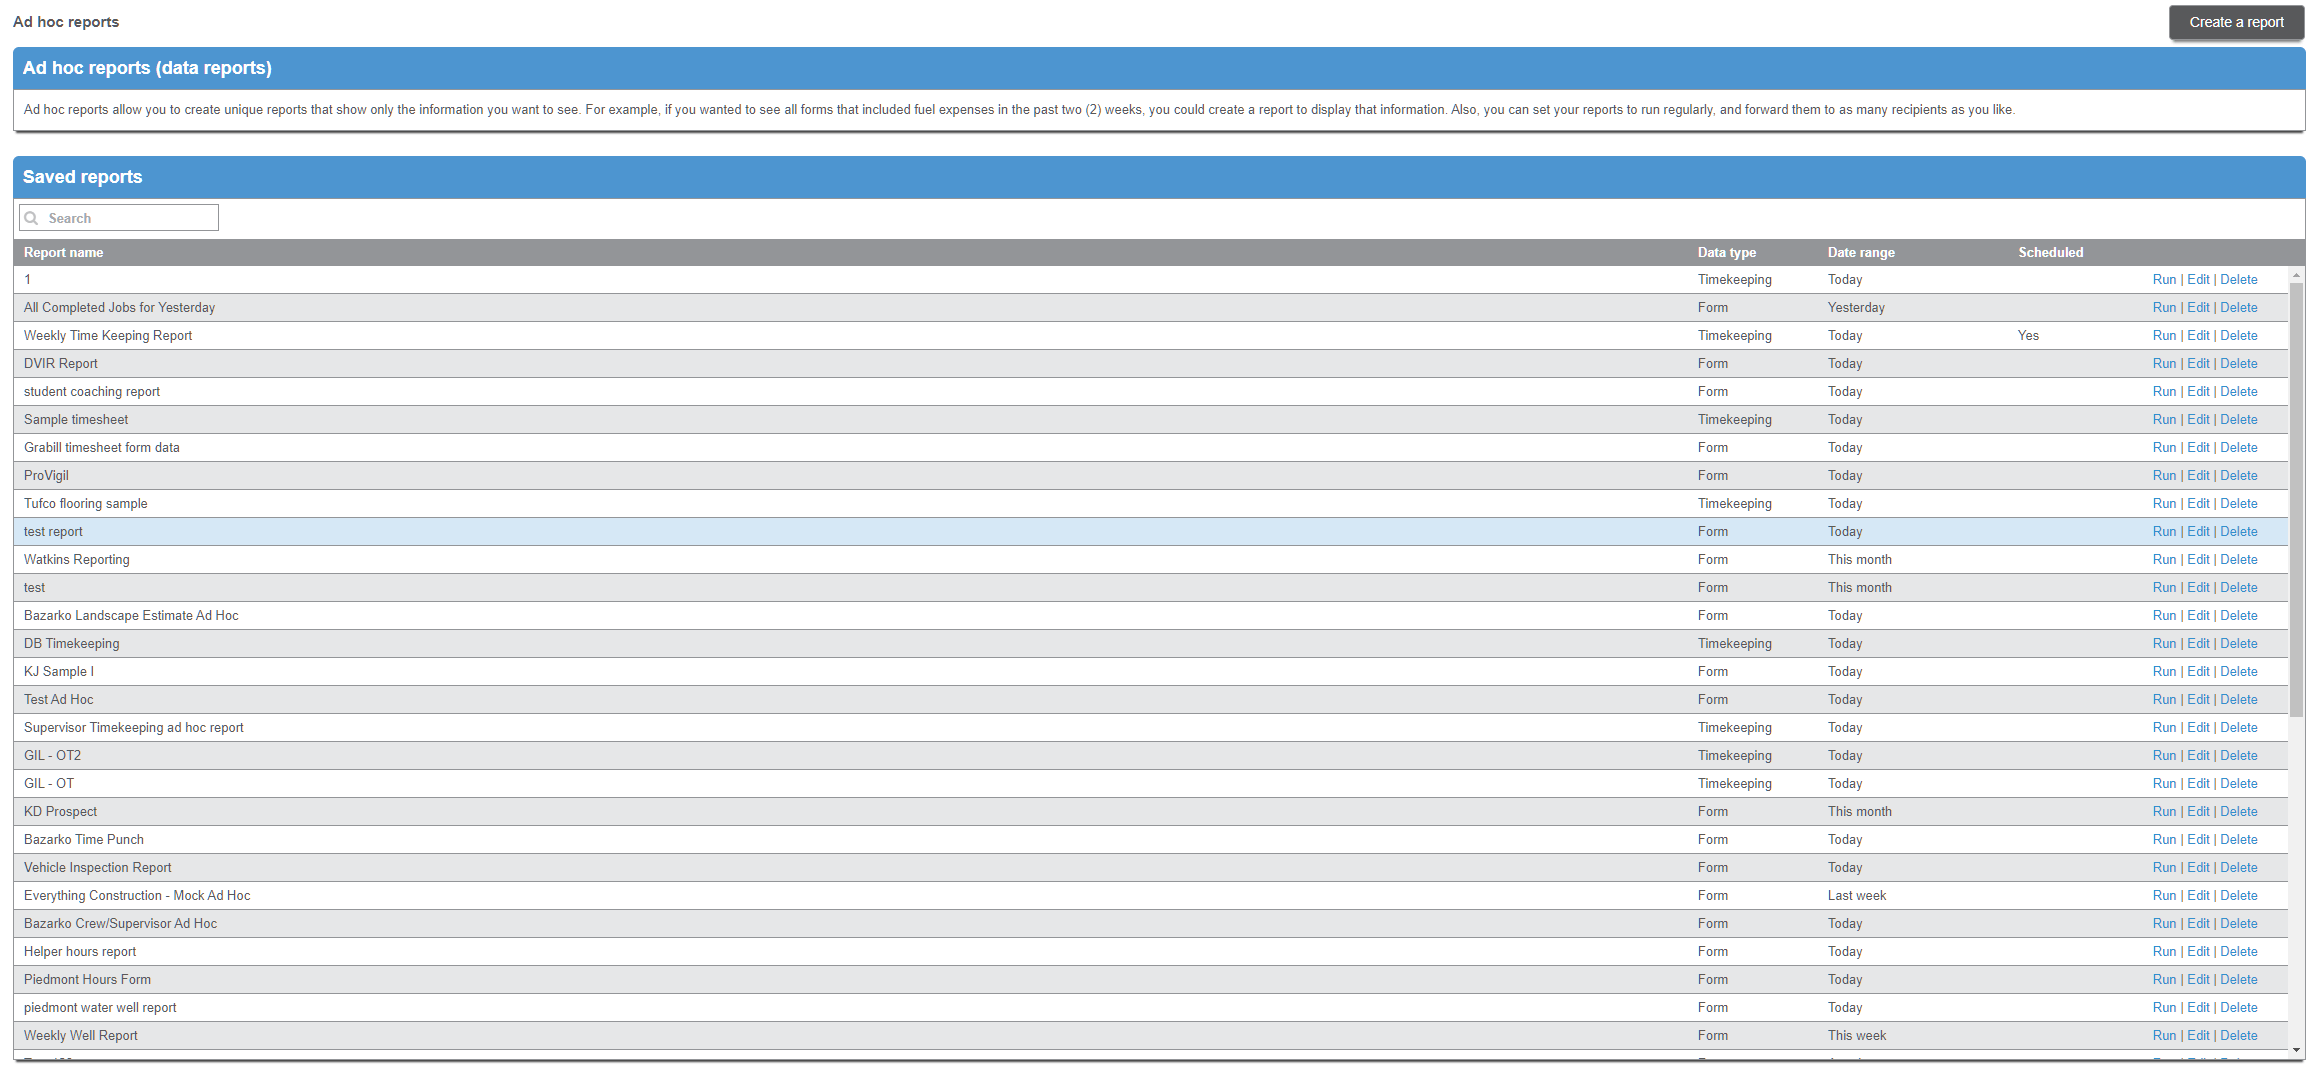
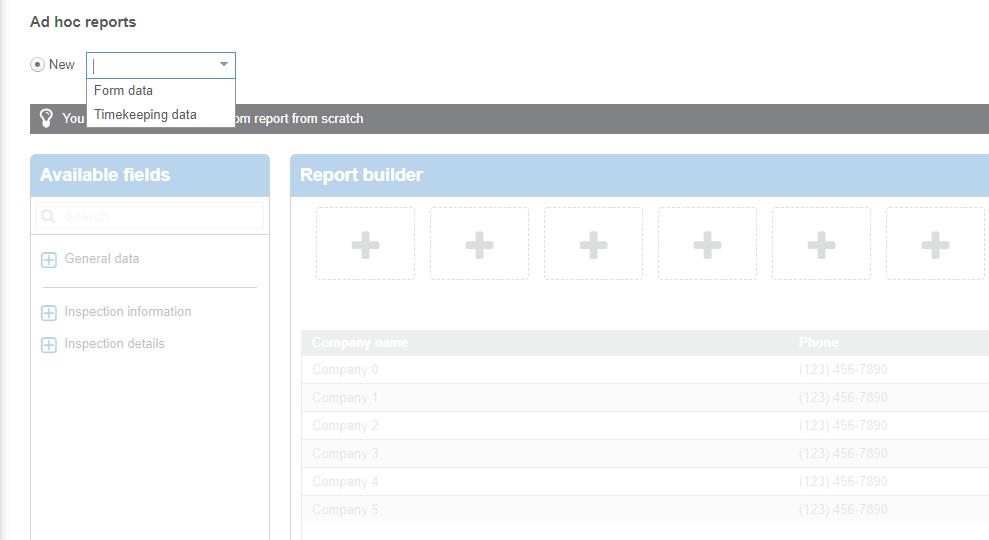
On our platform, it is possible to run form reports with specific field values as search parameters. The Scan and List field types have now been added to the list of available conditions in Form reports, Form schedule reports, as well as Ad hoc reports conditions.
Tier/s available:
· Workforce Manager
o Enhanced
o Premium
· Workforce Manager Shield
o Enhanced
o Premium
Training
Scan and list fields as conditions in form reports:
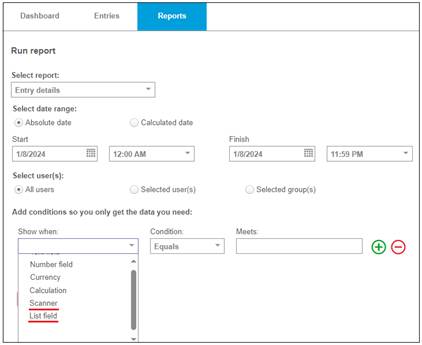
Scan and list fields as conditions in form schedule reports:

Scan and List field types in Ad hoc report Conditions:
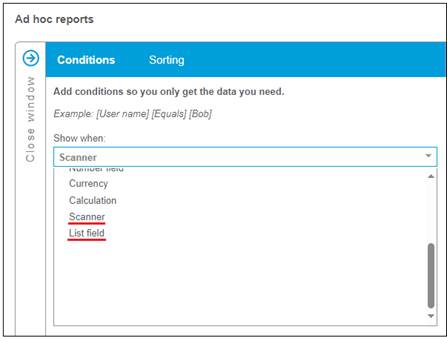
Note: The List field type can only be used with Equals in the condition.
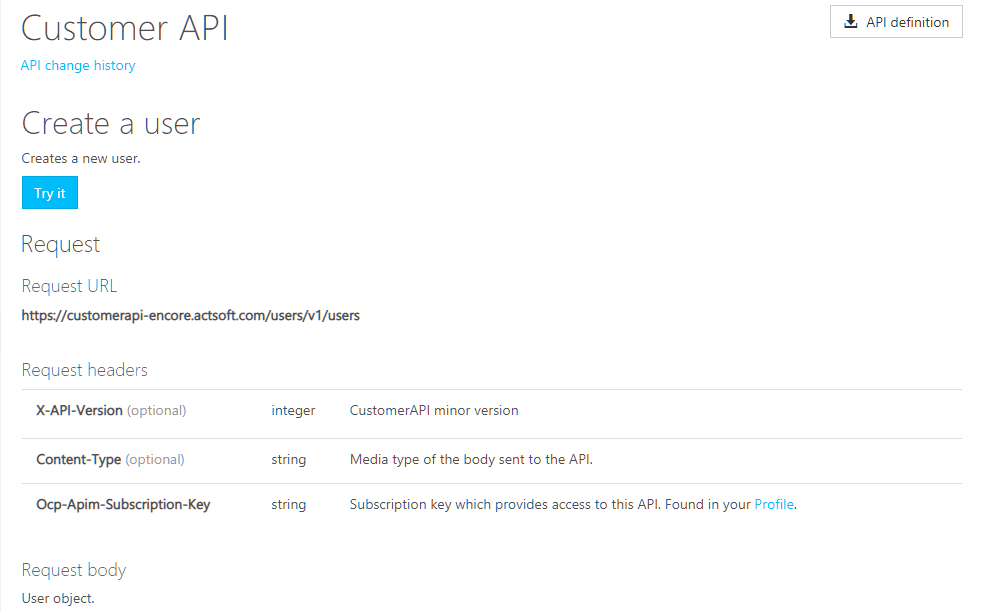
Developers can utilize the Customer API to extract or update data within our application. As an upgrade to the "Get custom list data by CustomListID" method, the returned values are now grouped by individual rows. Also, we have migrated all the Custom list methods to the newer Customer API Version 2 section.
Benefits
· It’s easier to identify each list row in the results.
Tier/s available:
· Workforce Manager
o Enhanced
o Premium
· Workforce Manager Shield
o Enhanced
o Premium
Training
A list with 3 columns and 2 rows will deliver the below output:
{
"RecordIndex": 161,
"Values": [{
"ColumnIndex": 1,
"Caption": "Part ID",
"Value": "1001"
}, {
"ColumnIndex": 2,
"Caption": "Part name",
"Value": "Air Filter"
}, {
"ColumnIndex": 3,
"Caption": "Make",
"Value": "Toyota"
}]
}, {
"RecordIndex": 164,
"Values": [{
"ColumnIndex": 1,
"Caption": "Part ID",
"Value": "2001"
}, {
"ColumnIndex": 2,
"Caption": "Part name",
"Value": "Motor mount"
}, {
"ColumnIndex": 3,
"Caption": "Make",
"Value": "Honda"
}]
}
Actsoft provides a platform for customers to be compliant with different security standards. In addition to that, our security policies are defined at the instance level. This means that all companies under the same instance have equal values for several security settings. This new feature will provide the ability to change some security parameters at a company-by-company level, such as passwords, web sessions, and automatic user deactivation.
Benefits
· It provides customers with more control over certain security aspects of their operations while maintaining the integrity of our application's security framework.
· Detailed documentation and guidance will be provided for users to understand the implications and limitations of changing security settings.
Use cases
- ABC Inc. is a customer in a non-secure instance that recently experienced a security attack on an unattended computer. Following this, they have implemented some new security protocols and have asked us to reduce the time before an idle session will time out. We can now help by modifying the 12-hour web session duration to a lower value.
· One of our secure instance customers has reported the inconvenience of having to change the password for their users every 60 days, especially when more than 90% of their users are spread throughout the United States and are over-the-road truck drivers, who don’t have time to go through the process of constantly changing passwords. With this new feature, we can adjust the setting while maintaining security integrity.
Tier/s available: All
The following security parameters can be modified on demand:
1- Password Complexity
The password complexity setting sets the rules related to password strength. This includes length, required characters, repeated characters, etc. A company can be changed to one of the three existing levels:
I.Basic
- Case sensitive
- Minimum 6 characters
II.Enhanced
- Case sensitive
- Minimum 8 characters
- At least one each: upper-case letters, lower-case letters, and numbers.
III.FedRAMP
- Case sensitive
- Minimum of 12 characters
- At least one of each: upper-case letters, lower-case letters, numbers, and special characters.
2- Password Maximum Age
The password lifetime gives the application the ability to treat passwords as expired if they are not changed within a configured number of days. Users who allow their password to expire are required to go through an email password reset workflow or contact an administrator to request a password reset.
This setting is currently only enabled for secure instances with a value of 60 days. Disabled = 0.
Recommended range: 15 - 365 days.
3- Password Reuse Generation
The password reuse policy prevents a user from using the same password for a maximum number of consecutive password generations.
Currently, it is only enabled on secure instances with a value of 24. Disabled = 0.
Recommended value range: 1 – 24.
Note: The password reuse policy does not apply to user password changes performed by an administrator.
4- Administrator Password Change Behavior
This policy gives the application the ability to specify the behavior when an administrator changes the password for a user. When enabled, the system treats the password as a temporary password and requires the user to change it on the next login. When disabled, the system treats the change the same way as a user changing the password themselves, with no need to change it on the next login.
Currently, only enabled on secure instances. Possible values:
None (0): Disabled
RequirePasswordChangeOnLogin (1): Enabled
5- Web Session Duration
This is the number of minutes before an idle session will timeout.
At present, it has a value of 15 for secure instances and 720 for non-secure.
Recommended range: 15 – 720.
6- Deactivate Inactive Users Days
This is the number of days before a user gets deactivated for not logging into the system.
Currently, it’s only enabled on secure instances with a value of 90. Disabled (0)
Recommended range 30 – 365.


 Actsoft partnered with Odin to provide our solutions overseas, through payment processing integrations. Odin helps us support user management for our software; customers can also purchase our products through Odin’s billing platform.

 VisTracks powers our Electronic Logging Device (ELD) solution, which enables transportation businesses to easily automate their hours of service logs, remain in governmental compliance, and reduce their potential to incur costly fines.
 Integration between Actsoft solutions and BeWhere’s software products is available. Take your team’s asset tracking, cellular data connectivity, and field insight a step further with effective, cross-application compatibility.
 CalAmp tracking devices for vehicles and assets alike are compatible with Actsoft solutions, making it easy for you to efficiently monitor your equipment and fleet cars. Help your team enhance accountability, safety, and savings through a combination of easily installed hardware and intuitive software.
 Gain even greater insight into the daily activities of your fleet using the combination of Geotab and Actsoft. Geotab devices provide detailed data collection and seamless integration with our solutions; learn more about the ways your vehicles are being used daily with the power of this tandem.
 Our partnership with Uniden is ideal for companies looking to gain advanced diagnostics on their fleets. Uniden’s extensive product listing of car electronics like radios, dash cams, radar detectors, and in-vehicle communicators work in concert with Actsoft’s solutions to better connect your vehicles to the company headquarters.
 Kyocera offers a wide range of mobile devices, ranging in design from traditional phones to ultra-durable handset technology. Actsoft is able to equip organizations in a variety of different industries with solutions for improved business, while Kyocera supplies the technology they can flawlessly operate on.

 Motorola’s mobile technology works in tandem with our solutions to provide extra versatility to your business practices. Coupled with our software’s features, Motorola’s reliable devices make connecting your workforce simpler than ever to do.
 Actsoft and Sanyo teamed up to merge intuitive business management software with the technology of today. This partnership allows us to provide you with all the tools your team needs for improved workflows, better coordination, and optimized productivity.
 We’re able to bundle certain solutions of ours (including our Electronic Visit Verification options) with Samsung devices to help your team achieve as much functionality as possible, while keeping rates affordable. Use these combinations for accurate recordkeeping, improved communication, and smarter data collection in the field.
 Our software is the perfect complement to Apple’s user-friendly technology. Equip your workforce with the devices and solutions it needs for optimized productivity during daily operations with Apple and Actsoft.