
New Features Sharpen Workforce Manager More Than Before
June 2025 Release
NEW FEATURES
·
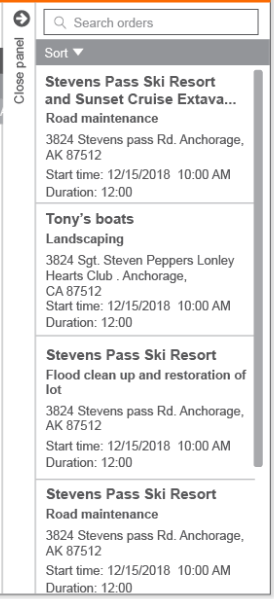
Recurring Orders Bulk Update
·
Notification Recipients in File Import
·
Last Status/Activity Report Update
·
Clients
Export Separate Address Fields
New features
Access control is essential for any application, as it
protects sensitive data by ensuring that only authorized users can access
specific features and information. In our system, user roles determine which
functions a user can access within the web application. With the introduction
of Custom User Roles, organizations can now define roles with tailored
permissions—beyond the default roles of Administrator, Power User, and Basic
User.
Benefits
-
Organizations can precisely control which
sections of the application users can view or modify.
-
Each custom role includes specific permissions,
restricting access to only the tools and data relevant to that role.
Use Cases
-
A company needs a role with more permissions than
a Regular User but fewer than a Power User—such as a supervisor or
manager. Custom Roles make this possible.
-
A customer is concerned about users creating
duplicate Dispatching clients with similar names (e.g., “St. Mary’s
Medical Center” vs. “St Mary’s Medical Center”). By restricting client creation
to the Clients page and limiting access to Power Users and Administrators,
duplicate entries by Basic Users can be prevented.
-
An organization wants a user to log in and view
only the Live View, with no access to other data or sections.
-
Customers have requested the ability to assign
different access levels to employees based on their roles. For example, a
dispatcher may only need access to the Dispatching module and nothing
else.
-
A customer wants to prevent all Admin users from
accessing the Admin Reports section. They've requested a conditional field
within the user profile to manage this permission.
Training
New
security permissions
To
support Custom User Roles, we first had to expand the system’s security framework
by introducing additional permissions for pages and objects that previously
lacked configurable access. This enhancement provides greater flexibility when
creating roles and gives organizations more granular control over which
features are visible or hidden for each user.
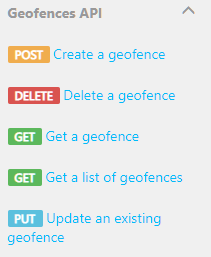
For
instance, Geofences now include specific security permissions—View, Edit, Add,
and Delete—allowing precise access control over this feature.
Managing
Custom Roles
Custom
roles can be created and managed in the
Administrative > Users
section of the web application. In the new
Roles
tab, administrators
can:
-
Create new custom
roles
-
View existing roles
-
Delete roles as needed
Creating a new role
Selecting
New role
will bring up a drawer with the list of all available security
permissions in the account. Here the user can check the permissions needed and
save the changes:
Editing an
existing role
When
editing an existing role, a drawer opens showing the current set of permissions
for that role. Users can add or remove permissions and save the changes. The
confirmation pop-up suggests notifying users of the changes applied:
Deleting a
user role
As the
in-app warning states, deleting a role will remove that role from the users
currently assigned to it and set them as Basic users.
Example
The
following example shows the creation of a new custom role copied from the Power
user system role. The requirement for this new role is to have a Power user who
can approve timekeeping entries, but cannot add new entries:
1-
View the Power user
role and select Copy:
2-
Check or uncheck
the permissions to be modified. In this case, uncheck Add, name the role, and click
save.
3-
Go to the Users
section and assign the new role to the desired user:
4-
After the modified
user logs in, the “New entry” button is hidden:
Important notes:
·
Not all sections or
pages currently have associated security permissions in
the
Roles
UI. More granular permissions will be added or adjusted based on
customer feedback, where possible.
·
System default
roles cannot be edited; they can only be copied.
·
Users assigned to a
deleted role will be reassigned to the system default Basic user role.
·
While live updates to user permissions are not typically
enforced, if permissions are removed from a role while users are still
connected, they may encounter a '403 Error – Permission Denied' when accessing
affected pages. In such cases, users will be given the option to navigate back
to another page within the application.
·
Order history
is controlled by the Dispatch>Orders view permission.
Internal
users interested in the new security permissions added to the platform can
refer to the following Wiki pages:
-
Security
Permissions and Roles.
-
CAB - Additional
Security Permissions
-
CAB Add Security
Roles to CAB Proposal.
We
are always looking for ways to provide our customers with more visibility into
system activity. While our web application already tracks who made changes,
what was changed, and when, it previously lacked a way to track deletions. To
address this, we’re introducing a new
Deletion Log
feature that displays
a list of deleted records—such as alerts, modules, users, and more.
Benefits
This
feature enhances
accountability
,
security
, and
compliance
by offering clear visibility into deletion actions. In cases of errors or
discrepancies, the deletion log allows administrators to trace specific
actions, promoting a culture of transparency and responsibility.
Use
Cases
-
A customer recently
experienced an issue in which two users were deleted from the web portal
without a clear record of who performed the action. With the Deletion Log,
they can now identify the responsible user and understand the context of
the deletion.
-
Another customer
stopped receiving geofence alerts for an employee named Michael, who works
at the Fresno Zoo. Upon investigation, they discovered that the relevant
geofence had been deleted, but they had no way to determine by whom or
why. With this new feature, they can identify the user who deleted the
geofence and retrieve the historical coordinates in order to recreate the
original polygon.
Tier/s available:
All
Training
The
Deletion Log
screen is located under the
Administrative
section
of the web portal. It provides a comprehensive history of deleted system items.
By
default, the screen displays a grid with the most recent 50 deletions. Users
can refine their search using the parameters panel, with filters available for:
-
Record Type
-
Users or Groups
-
Date Range
The
Type
column identifies the category of the
record that was deleted. Additional columns display the
record name
, the
date and time of deletion
, and the
name of the user
who performed
the deletion.
Supported Record Types
The Deletion Log currently tracks deletions for the
following record types:
-
Client
-
User
-
Group
-
Geofence
-
Geofence
Type
-
Vehicle
-
Alert
-
Timekeeping
-
Module
-
Custom
List Row
-
Custom
List Definition
-
Ad
Hoc Report
-
Recurring
Order
Additional Notes
-
Only
record types that support an audit trail (i.e., have a
Show History
option) will display a
View History
link in the grid.
-
The
system will begin tracking deletions from the date this feature is
deployed. As such, deletions made prior to the update will not appear in
the Deletion Log and cannot be recovered or reviewed retroactively
In both web and
mobile application design, bulk editing is a valuable feature that streamlines
common actions such as editing, labeling, changing statuses, moving, or
deleting multiple items at once. In response to customer feedback, we’re
excited to introduce bulk update functionality for
recurring order templates
—available
now with this release.
Benefits
-
Improved efficiency for dispatchers:
Bulk updates
significantly reduce the time and steps required to manage recurring
orders, freeing dispatchers to focus on higher-priority tasks.
-
Accident prevention:
Additional
confirmation prompts help safeguard against unintentional mass deletions.
Use Cases
-
A dispatcher currently edits the
"Laboratory Type" custom field one recurrence at a time. With
bulk editing, this time-consuming task can now be completed in just a few
clicks.
-
A customer with over 100 recurring
orders wants to quickly mark them as active or inactive. Previously, they
had to update each order individually—now, they can apply this change all
at once.
-
ABC Inc. needs to delete
a large number of
outdated recurring orders. The
ability to select and delete multiple entries simultaneously saves
significant time and effort.
Tier/s
available:
·
Workforce Manager
o
Premium
·
Workforce Manager
Shield
o
Premium
Training
The
bulk update
functionality
for recurring orders closely mirrors the experience found in
the Clients module. A standard checkbox column has been added to the
Recurring
Orders
screen, allowing users to select multiple rows and apply bulk
actions.
Bulk Deletion
To delete multiple
recurring orders:
-
Select the desired rows using the
checkboxes.
-
Click
Delete
.
-
Confirm the deletion when prompted.
Paging
Paging has been
enabled on the Recurring Orders grid to support bulk actions. Users can choose
to display
300
,
1,000
, or
2,000
rows per page. Note that
bulk actions will only apply to records visible on the current page.
Bulk Editing
When two or more
rows are selected, the
Bulk Edit
button becomes active. Clicking this
button opens options to modify shared recurrence parameters across all selected
templates.
The bulk editing screen:
Recurrence fields
available for the bulk update:
General
Client
Duration
Start time
Use current client values
User
Recurrence details
Active
Create in advance day(s)
Day of the month
Day of the week
End on
No end date
Run every
Schedule
Start recurrence on
Address and Second
Address
(when enabled)
Address 1
Address 2
City
Country
Postal code
State/Region
Subregion
Client
Details
(custom fields)
The
File Import
feature enables users to upload data from external files,
eliminating the need to manually re-enter information into the application.
Once uploaded, the data becomes available for viewing and modification within
the appropriate section of the system.
With
this release, we’ve enhanced the File Import functionality for accounts using
the
Dispatching
module by allowing users to import
Notification
Recipients
directly.
Benefits
-
Ideal for customers
needing to refresh one or more clients with multiple associated addresses
quickly and efficiently.
-
Notification
recipients can now also be imported using the
Customer API
, further
streamlining the data entry process.
Use
Case
A
customer reported the following challenge:
“We
use email notifications for status alerts, but currently have to enter
recipient email addresses one by one for each client. It’s extremely
time-consuming. The only method available now is to open each client
individually and manually type in the emails. Please add an import option to
simplify this process.”
With
this new enhancement, users can now import recipient information in bulk,
saving significant time and effort.
Tier/s
available:
·
Workforce Manager
o
Enhanced
o
Premium
·
Workforce Manager
Shield
o
Enhanced
o
Premium
Training
A new
file type—
Client Notification Recipients
—has been added to the list of
supported import templates. Users can select this option to upload a
spreadsheet that includes email notification recipients associated with each
client.
Mapping fields
Once
in the mapping interface, users can link columns from the file to the following
client recipient system fields:
-
Client name
- Look up field
-
Recipient name
- Text field - Notification recipient name.
-
Mobile number
- Phone number field - Recipient phone number.
-
Email
- Email field - Recipient email address.
-
Notification type
- Expected string/text in file.
Notification types available:
-
None
-
Text
-
Email
-
Text and email
These
options are determined by the company's enabled features and match the
notification types available in the web app when creating a recipient.
Defining
your fields:
Important rules for the
import
:
·
The
Insert new record
option will
add new notification recipients to a
Client
.
·
The
Update
existing record
option
uses
the Notification recipient 'Name' field as the lookup field for the update.
·
If the
contact
name doesn’t exist, a new recipient for that
client profile is created.
·
File import will update clients
regardless of the activation status, thus inactive clients will be updated.
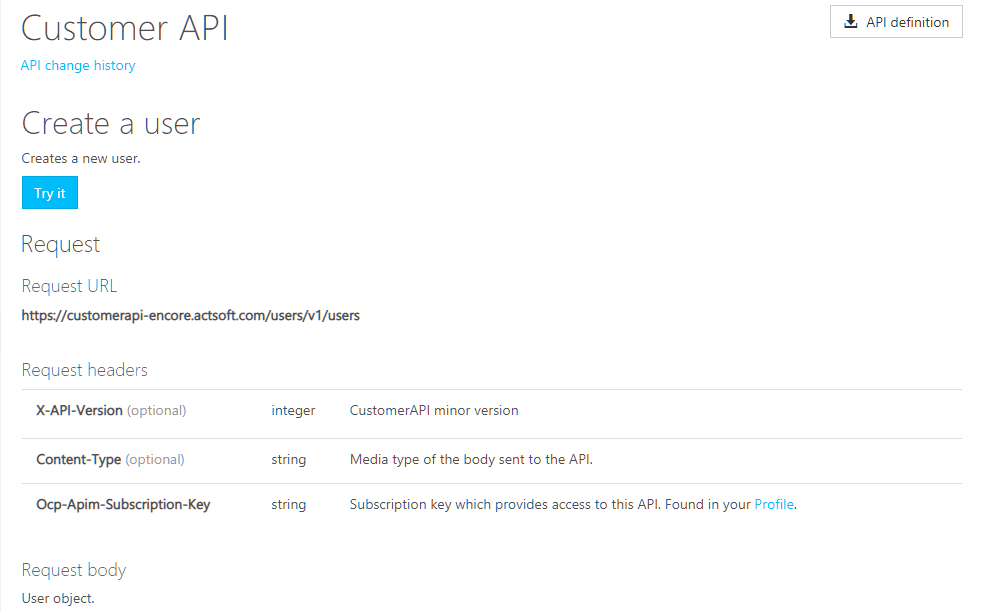
Customer API
The Customer
API v2 has been updated to include endpoints for Client notification recipients,
similar to
how other Client-specific fields can be
updated:
POST
https://qaencoreapimanagement.azure-api.net/V2/clients/33554454/recipients
HTTP/1.1
X-API-Version: 13
Content-Type: application/
json
Cache-Control: no-cache
Ocp
-
Apim
-Subscription-
Key: ••••••••••••••••••••••••••••••••
{
"Name":
"Michael Smith",
"
MobileNumber
":
"813-286-7333",
"
EmailAddress
":
"michael11_25@gmail.com",
"
NotificationType
":
"Text"
}
Access to detailed data gives customers greater control over their
operations. The new
Vehicle Change History
feature provides
users—particularly fleet managers—with a powerful tool to monitor and track all
modifications made to vehicle records. This enhancement increases transparency
and visibility into the many updates a vehicle may undergo throughout its lifecycle
in the system.
Benefits
-
Enables
managers to oversee vehicle-related changes and quickly resolve
discrepancies or errors.
-
Offers
a clear, chronological timeline of all changes made to a vehicle,
including
what
was changed,
when
, and
by whom
.
Use Cases
-
ABC
Inc.
discovered that several vehicle
records had been modified and requested a way to track who made the
changes and what specific updates were applied.
-
A
company with multiple users authorized to edit vehicle records experienced
workflow disruptions due to incorrect changes. Without a change history,
they had no way to identify the responsible users. The new feature allows
them to trace edits and take corrective action, such as additional
training for the users involved.
Tier/s
available:
All
Training
A
Show History
button—consistent with other parts of the
application—has been added to the
Vehicle/Asset Information
screen.
Clicking this button displays a detailed log of all recorded changes,
empowering users with the insights they need to manage vehicle records more
effectively.
From now
on, all changes made to vehicles will be recorded and presented in the history
report.
The
following image depicts the history of
a vehicle
creation,
plus a subsequent change to assign device UNIT 3:
To enhance transparency and improve auditability, a new
Show
History
button has been added to the Geofence screen. This feature provides
users with a detailed, time-stamped log of all changes made to a specific
geofence.
Benefits
-
Offers
a quick and efficient way to review the history of geofence modifications.
-
Helps
users
track changes, identify responsible users, and maintain data integrity
across the system.
Use Case
ABC Inc.
reported
unexpected modifications to several geofences and requested a way to determine
who made the changes and what was altered. The new feature meets this need by
providing a clear audit trail for every edit made.
Tier/s
available:
All
Training
The standard
Show History
button has been added to the
Geofence
Editing
screen. Users can click this button to access a complete record of
changes, including the user who made the update, the date and time of the
change, and the specific fields that were modified.
Examples
The following changes were made to a circle-type geofence:
1- The Radius was decreased from 827 ft to 361 ft.
2- The name changed from “Fire station” to “Bradenton Fire Station”.
Example of changing from Circle to Polygon
|
Field |
From |
To |
|
Shape |
Circle |
Polygon |
|
Latitude |
28.123 |
34.456 |
|
Longitude |
-82.123 |
-60.123 |
|
Radius |
700ft |
0ft |
|
Points |
Empty |
28.123 -82.13, 28.234 -82.345 |
Note:
·
The system will
begin recording changes starting from the system update date; therefore, no
historical data is available for changes made prior to that point.
·
Circle geofences
are defined by a center point (latitude and longitude) and a radius measured in
feet.
·
Polygon geofences
are defined by a comma-separated list of points that make up the polygon. There
is a 5,000-character limit on the points that can be audited.
Groups play a vital role in keeping your data
organized. They help you quickly find what you need and control access to
modules and forms by defining permissions at the group level—ensuring that
users only see the tools relevant to their roles. This enhancement is
especially valuable for customers with
a large number of
users or locations, making it significantly easier to assign items to groups.
Benefits
-
Speeds up the
process of assigning locations, reducing user frustration and improving
the overall
experience.
-
The updated
drawer-style
interface
offers a larger viewing area, displaying more content than
the previous editing panel and improving usability.
Use Cases
-
A customer
using the Dispatching module has over 2,500 clients in their account.
Previously, when assigning clients to a group, the
Clients
panel
displayed only the first 300 records. This forced users to rely on
repeated text searches to locate and assign additional
clients—
creating
a time-consuming and inefficient process.
-
Feedback from
an internal user: “CAB can only display the first 300 Clients or Geofences
when assigning them to Groups, which turns the task into a never-ending
series of keyword searches to ensure all relevant records are located and
properly grouped.”
Tier/s available:
All
Training
Enhancements to the Groups section in the web
application include:
-
Each of the
four assignment panels (e.g., Clients, Locations, Geofences, Users) now
uses a
larger drawer-style screen
instead of the previous small,
editable side panel. This layout provides more space and better
visibility.
-
The previous
limitation on the number of visible records has been removed. Now,
all
available records
are displayed for each panel.
-
The
Locations
panel now includes
paging
, allowing users to navigate through large
sets of data efficiently.
Editing members of a group:
Editing users who view a group:
Editing Locations:
Vehicles > Sensor template
To maintain consistency, the screen for assigning
vehicles and groups to the template has been updated to a vertical layout with
one column and two rows.
Notes:
For paged grids, you’ll need to save your
selections on each page individually, as selecting items across multiple pages
isn’t supported.
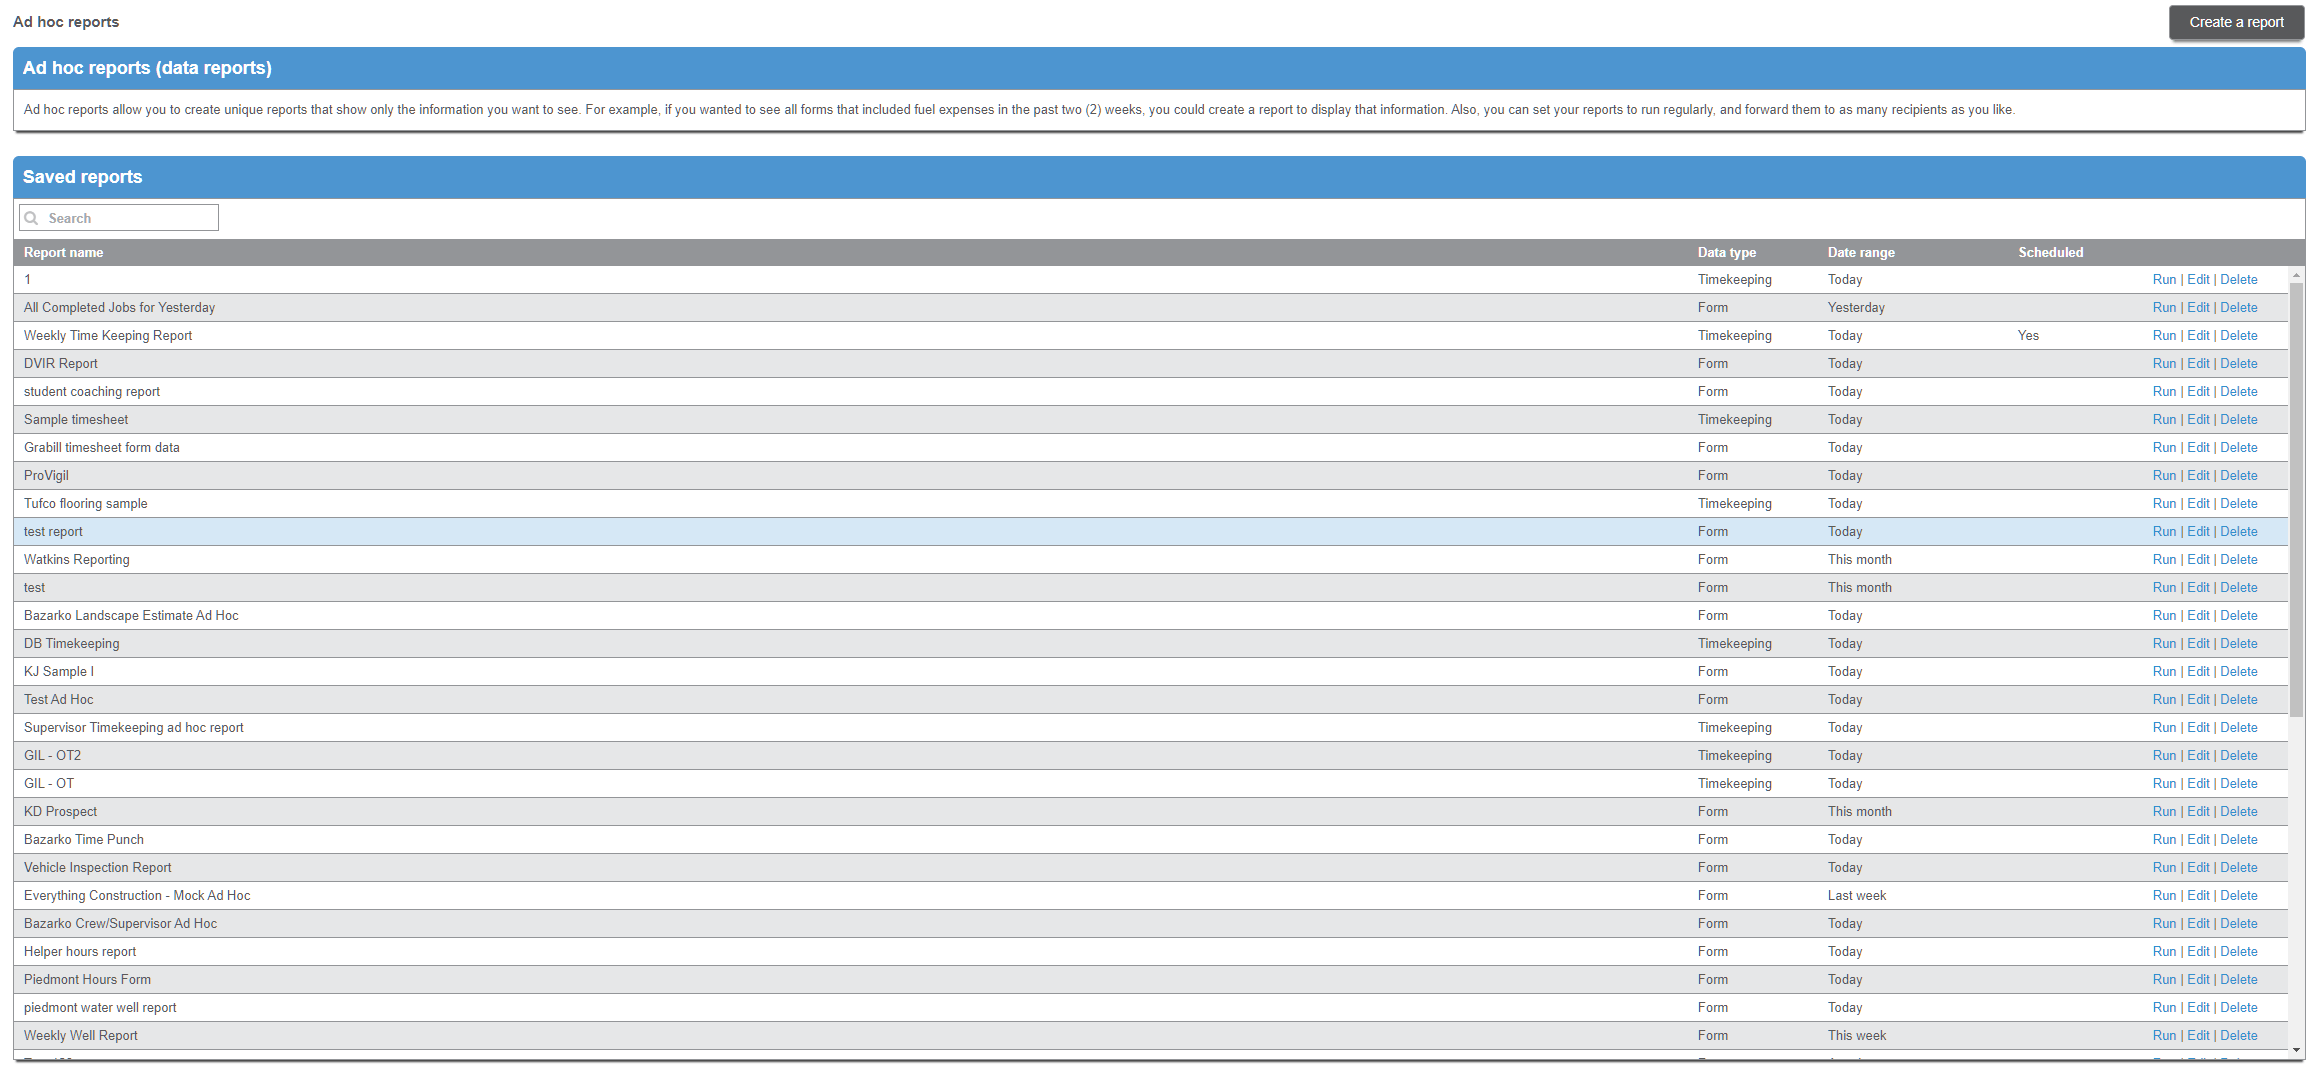
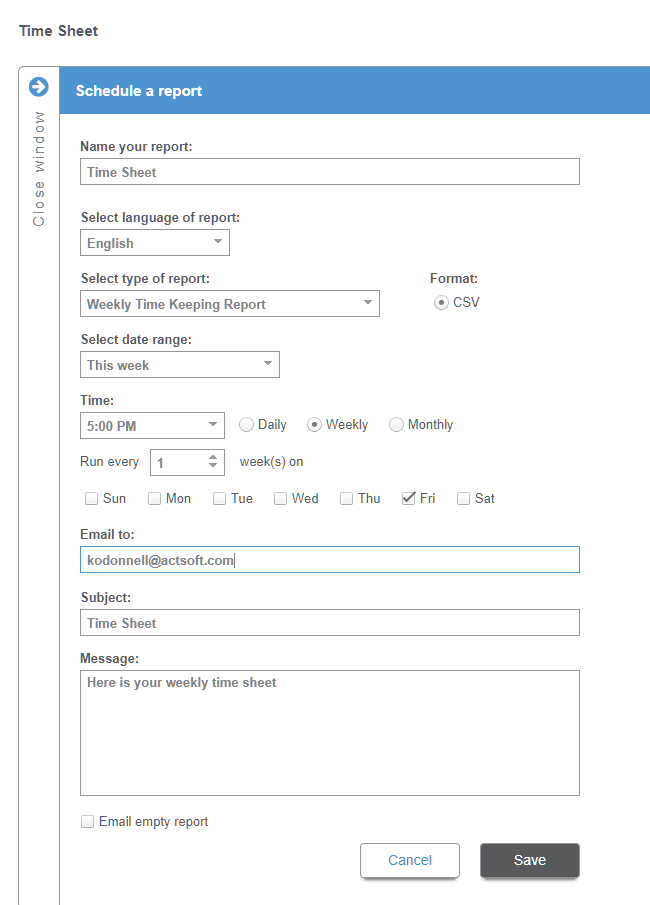
A year ago, we introduced the
Reports
option in
the
Administrative
section of the web application, giving users the
ability to generate system-wide reports not tied to a specific module. Based on
customer feedback, we’ve now made several key enhancements to the
Last
Status/Activity Report
, expanding its flexibility and usefulness.
Benefits
-
Users can now customize report criteria to pull
more targeted and relevant data.
-
The enhanced search parameters allow for greater
control, helping users drill down into specific subsets of information
instead of relying solely on a global report.
Use Cases
-
A customer requested the ability to run the
report and display results
only for users with an Active status
.
-
Another customer wanted to filter the report to
show
only employees working in the field
, specifically focusing on
mobile
app users
to monitor their activity.
Tier/s available:
All
Training
The
Run Report
page now includes several new
search parameters to provide more refined control over the data returned:
-
Select License Type
: Filters results by license type—
User
,
Web
only
, or
All
(default).
-
Include Inactive Users
: A checkbox that allows inactive users to be
included in the results. This is
unchecked by default
.
-
GPS Tracking
: Allows filtering by GPS tracking status—
Active
,
Inactive
,
or
All
(default).
-
Show Mobile Access Only
: A checkbox that limits results to
mobile-only
users
. Default is
unchecked
, returning all users.
Notes:
-
No changes were applied to the report output,
only to the report parameters.
In the web portal, users can export data from the
Clients
grid into a CSV file. Many customers rely on this export to
review and update client information, which is then re-imported into the
system. To streamline this workflow, we’ve enhanced the export functionality by
adding individual address fields
alongside the existing combined address
column.
Benefits
-
Reduces manual
data preparation by eliminating the need to split address information into
separate fields prior to import.
-
Improves
accuracy and efficiency when updating client records using the
export/import process.
Use Case
A customer reported that while the import process
requires address components—such as
street address, city, state, and ZIP
code
—to be in separate columns, the export file provided only a single
combined address field. This made monthly updates cumbersome, as the address
had to be manually split into multiple columns before re-importing. With this
update, all relevant address components are now exported in both
combined
and
individual field
formats, resolving this inefficiency.
Tier/s available:
·
Workforce Manager
o
Enhanced
o
Premium
·
Workforce Manager
Shield
o
Enhanced
o
Premium
Training
The
Clients
grid export now includes the
following columns, with the
newly added address fields
highlighted:
-
Client Name
-
Address
(combined)
-
Contact Name
-
Contact Email
-
Contact Phone
-
Address Name
-
Address 1
-
Address 2
-
City
-
State / Region
-
Postal Code
-
Subregion
-
Latitude
-
Longitude
-
Open
Orders
-
Client
Reference Number
-
Active
-
Client Groups
-
Client Custom
Fields


 Actsoft partnered with Odin to provide our solutions overseas, through payment processing integrations. Odin helps us support user management for our software; customers can also purchase our products through Odin’s billing platform.

 VisTracks powers our Electronic Logging Device (ELD) solution, which enables transportation businesses to easily automate their hours of service logs, remain in governmental compliance, and reduce their potential to incur costly fines.
 Integration between Actsoft solutions and BeWhere’s software products is available. Take your team’s asset tracking, cellular data connectivity, and field insight a step further with effective, cross-application compatibility.
 CalAmp tracking devices for vehicles and assets alike are compatible with Actsoft solutions, making it easy for you to efficiently monitor your equipment and fleet cars. Help your team enhance accountability, safety, and savings through a combination of easily installed hardware and intuitive software.
 Gain even greater insight into the daily activities of your fleet using the combination of Geotab and Actsoft. Geotab devices provide detailed data collection and seamless integration with our solutions; learn more about the ways your vehicles are being used daily with the power of this tandem.
 Our partnership with Uniden is ideal for companies looking to gain advanced diagnostics on their fleets. Uniden’s extensive product listing of car electronics like radios, dash cams, radar detectors, and in-vehicle communicators work in concert with Actsoft’s solutions to better connect your vehicles to the company headquarters.
 Kyocera offers a wide range of mobile devices, ranging in design from traditional phones to ultra-durable handset technology. Actsoft is able to equip organizations in a variety of different industries with solutions for improved business, while Kyocera supplies the technology they can flawlessly operate on.

 Motorola’s mobile technology works in tandem with our solutions to provide extra versatility to your business practices. Coupled with our software’s features, Motorola’s reliable devices make connecting your workforce simpler than ever to do.
 Actsoft and Sanyo teamed up to merge intuitive business management software with the technology of today. This partnership allows us to provide you with all the tools your team needs for improved workflows, better coordination, and optimized productivity.
 We’re able to bundle certain solutions of ours (including our Electronic Visit Verification options) with Samsung devices to help your team achieve as much functionality as possible, while keeping rates affordable. Use these combinations for accurate recordkeeping, improved communication, and smarter data collection in the field.
 Our software is the perfect complement to Apple’s user-friendly technology. Equip your workforce with the devices and solutions it needs for optimized productivity during daily operations with Apple and Actsoft.