New Features Sharpen TeamWherx More Than Before
RECURRING ORDERS
This new feature added to the Dispatching module makes possible to schedule job orders that have a regular occurrence. Recurring orders automates the process of order creation and dispatch to workers in the field. All this achieved with minimal user interaction with the application.
Benefits
- Allows users to schedule an order dispatch for a future date and time.
- There is no need to manually create a work order for each occurrence.
- Ability to create a recurring order based on an existing order.
- The option to Copy templates will save time, by creating a new template with similar parameters.
Training
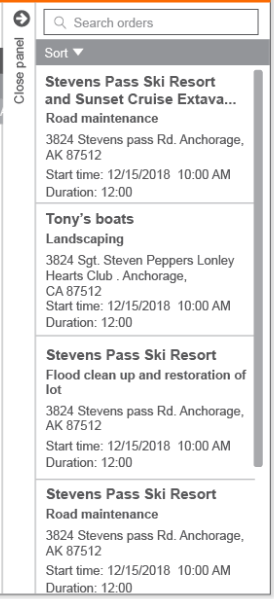
Recurring orders templates
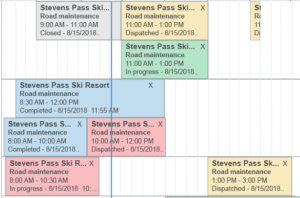
A new section named Recurring orders has been added to the Dispatching side navigation area. The grid contains all the recurring templates, allowing users to create, delete and edit existing templates.


The new Recurring orders grid.
Set order creation time
In this section users can set the time of the day when orders will be created. It is a global setting for all templates.
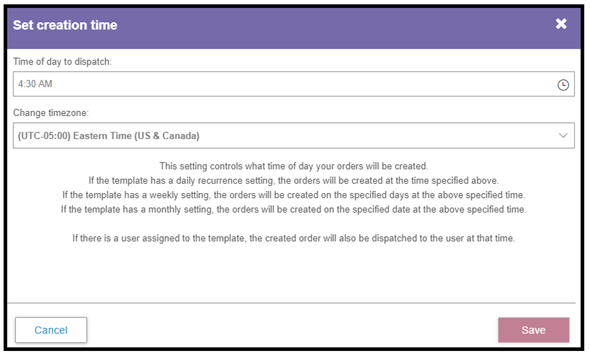
Changing the creation time will change the time of the next run; if orders have been created for the day, the recurrence will run at the new time as per schedule.
Steps to create a new recurring order template:
- Select New recurring order.
- Enter the order information as you normally do for a regular order, selecting the client and service details.
- Expand the Recurrence details section.
- Set the Start and End dates. This will be the period of time for the recurrence to happen. You can also select No end date to let the template run indefinitely.
- Schedule the orders to be created Daily, Weekly or Monthly. Selecting Weekly will give you options to select the days of the week. Selecting Monthly will allow you to select the day of the month.
- Set how many days in advance the order will be created.
- If a user is selected the order will be created with a Dispatched status and sent to the user’s app at time of creation.If no user is selected the order will be created with the New status, to be manually assigned by the dispatcher previously to the Start time.
- Choose the Start time and Duration in hours and minutes and Save the template.
- Once the template is saved the Next order will be created section will populate showing the next creation date according to the schedule configured.
- Last order created will show the last date and time an order was created.

The new Recurring orders settings screen.
Copy template
Selecting this option will copy all the information contained in the template to a new one. Allowing the user to keep or modify the client information, client details, service details and recurrence details.
Creating a template from an existing order
There is also a possibility to create a new recurring template from an existing order. The Options button has replaced the existing Copy order button where you can create a recurring template.
The new recurring template will keep the same information as the source order. Fill out the template and Save.

The new Options selector to access Create recurring template.
Video

ORDER STATUS LEVELS
Order status levels are intended to allow for certain order statuses to be subsequent to others. Dispatchers can now define specific following statuses, limiting what the users will see as their next available status for the service they are working on.
Benefits
- This helps mitigate challenges with selecting the wrong order status when multiple statuses exist within a service.
- It ensures employees do not skip over order statuses and cover all their required tasks while on a job site.
- Flexibility exists within the limits. This feature permits users to set one or more statuses as the following available.
Training
A new column named Next available status(es) has been added to the Module settings in Dispatching. Note that only statuses of the ‘In progress’ and ‘Dispatched’ types can have associated next statuses.
If a status does not have any associated status defined the column will display ‘All’ and all statuses are available to be selected as the following status.
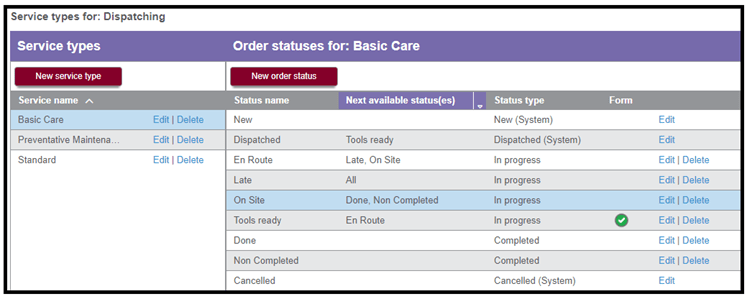
Order statuses grid showing the Next available status column
Steps to add next available statuses to a service:
- Select the desired service from the service types column.
- Add a New order status or Edit the status to configure the next available statuses. If you are creating a New service type create the statuses needed for the service, then define the next available statuses.
- Make sure to Publish changes to the module before exiting.
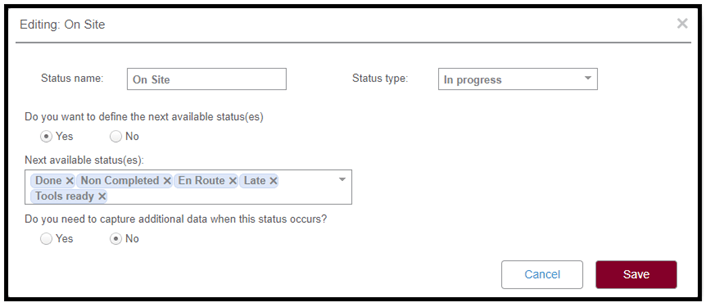
Adding the next available statuses
Video
ENHANCEMENTS
ADDITIONAL FILTERS FOR CUSTOM LISTS
We have added additional filtering options to the list field type. These enhancements refine the way data is displayed when filling out Wireless Forms. Having the ability to filter a Custom List by a previous field, the user logged to the app or a list value, makes possible to streamline selections within the Custom List by automatically filtering what is relevant to the user.
Benefits
- Until now, list filtering was possible only by utilizing the value from a previous list field; there are more options available now to filter the list.
- The new filtering methods allow users to have more control over the data displayed, helping them avoid unwanted data.
- This enhancement adds versatility to the use of Custom Lists within forms and helps users more efficiently manage lists with large amounts of data.
Training
Setting up additional filters to a List field
- Go to the module settings and add the List field. Select the List name from the drop down and the Column to display.
- Check off Apply filters to this list, and the filter definition will pop-up. You can add as many condition rows as you want.
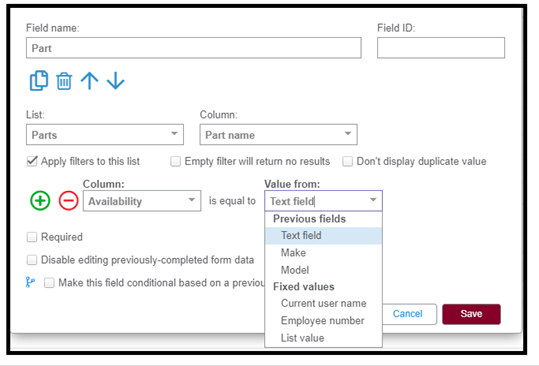
- Select the Column to filter from and set the Value from; this is where you will be able to select any of the new options available within Previous Fields or Fixed Values.
- Save the changes and Publish or Save draft.
Empty filter will return no results
If the previous form field used in the filter is left blank, there is nothing to filter by and all records will be presented. In some circumstances this will be a non-desired outcome. To prevent this, select Empty filter will return no results. This option hides all results from displaying, until the filter has data to compare.
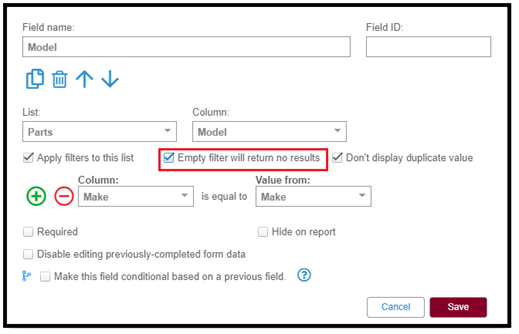
Enabling empty filter will return no results
Example:
State list (FL, AL, TX, CA)
City list (FL: Miami, FL: Tampa, FL: Brandon, FL: Clearwater, FL: Sarasota, AL: Mobile, TX: Houston, TX: Dallas, CA: San Diego, CA: LA) If the ‘State’ field were ignored by the handset user and they went straight to the ‘City’ field, they would see a drop-down list with all ten items.
But, if they chose FL, they would only see five items.
Filtering by previous fields
In addition to filter the list by a previous list field, it is now possible to filter the list by a previous Text field within the same form. Once the app user enters a value in the text field, that value will be used to filter the list.
Selecting a Previous field to filter the list
Filtering by fixed values
Fixed values are data existing in the custom list. Three types of fixed values available and those are Current user name (username used to login to the app i.e.: rpeterson, not the name Robert Peterson), Employee number and List value.
Selecting List value will open an additional Select value drop down where the fixed value can be set.
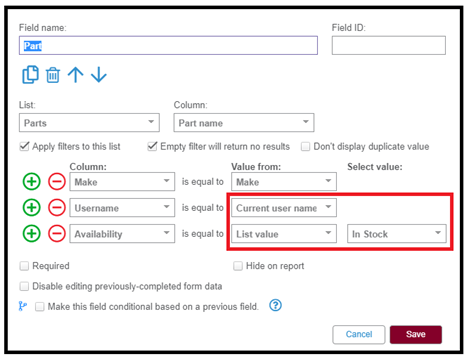
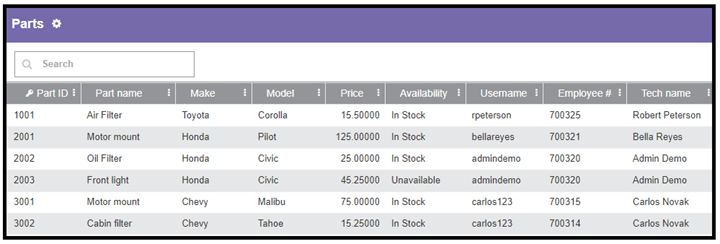
Example: Parts list from the image above.
Assuming employee with user name admindemo is filling out the form and field Make = Honda; the filter will return Part name = Oil filter, the only part in stock assigned to the user.
List example
Video
CHARACTER LIMIT INCREASE IN FORM BUILDER
We have increased the character limit in form fields. Customers can build more complex and versatile forms according to the business needs.
- The form field name maximum length is now 20,000 characters.
- The maximum length for Drop-Down, Radio and Checkboxes (each list value) is now 4,000 characters.
- The default text value maximum length is now 4,000 characters.
- The page name maximum length is now 500 characters.


 Gain even greater insight into the daily activities of your fleet using the combination of Geotab and Actsoft. Geotab devices provide detailed data collection and seamless integration with our solutions; learn more about the ways your vehicles are being used daily with the power of this tandem.


 Actsoft partnered with Odin to provide our solutions overseas, through payment processing integrations. Odin helps us support user management for our software; customers can also purchase our products through Odin’s billing platform.

 VisTracks powers our Electronic Logging Device (ELD) solution, which enables transportation businesses to easily automate their hours of service logs, remain in governmental compliance, and reduce their potential to incur costly fines.
 Integration between Actsoft solutions and BeWhere’s software products is available. Take your team’s asset tracking, cellular data connectivity, and field insight a step further with effective, cross-application compatibility.
 CalAmp tracking devices for vehicles and assets alike are compatible with Actsoft solutions, making it easy for you to efficiently monitor your equipment and fleet cars. Help your team enhance accountability, safety, and savings through a combination of easily installed hardware and intuitive software.
 Our partnership with Uniden is ideal for companies looking to gain advanced diagnostics on their fleets. Uniden’s extensive product listing of car electronics like radios, dash cams, radar detectors, and in-vehicle communicators work in concert with Actsoft’s solutions to better connect your vehicles to the company headquarters.
 Kyocera offers a wide range of mobile devices, ranging in design from traditional phones to ultra-durable handset technology. Actsoft is able to equip organizations in a variety of different industries with solutions for improved business, while Kyocera supplies the technology they can flawlessly operate on.

 Our software is the perfect complement to Apple’s user-friendly technology. Equip your workforce with the devices and solutions it needs for optimized productivity during daily operations with Apple and Actsoft.
 Actsoft and Sanyo teamed up to merge intuitive business management software with the technology of today. This partnership allows us to provide you with all the tools your team needs for improved workflows, better coordination, and optimized productivity.
 Motorola’s mobile technology works in tandem with our solutions to provide extra versatility to your business practices. Coupled with our software’s features, Motorola’s reliable devices make connecting your workforce simpler than ever to do.
 We’re able to bundle certain solutions of ours (including our Electronic Visit Verification options) with Samsung devices to help your team achieve as much functionality as possible, while keeping rates affordable. Use these combinations for accurate recordkeeping, improved communication, and smarter data collection in the field.