<--!
<--!  -->
-->

New Features Sharpen TeamWherx More Than Before
WIRELESS FORMS GRID UPGRADE
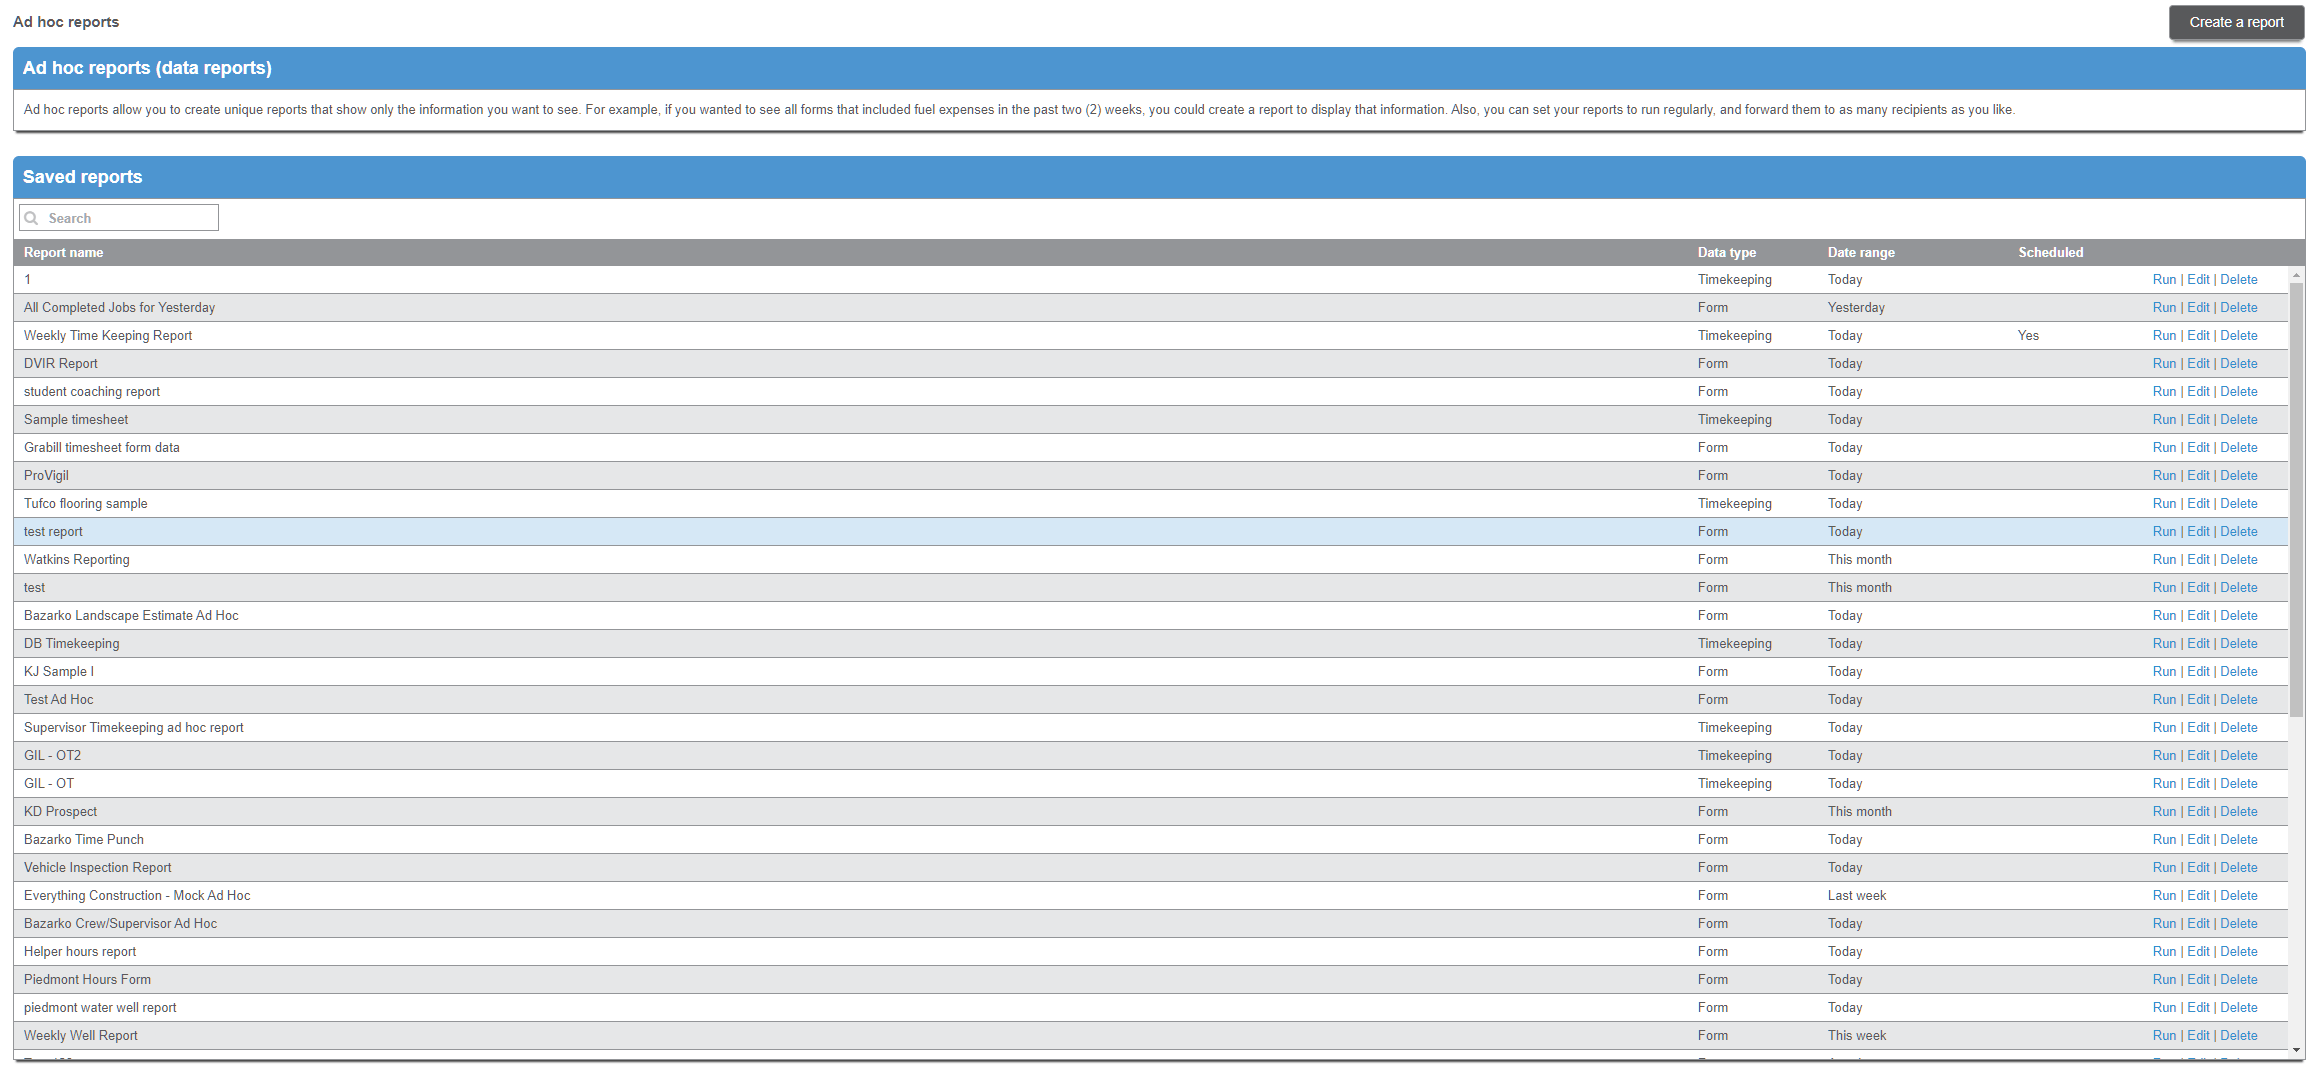
We continue to improve grids on our web platform in order to provide a better customer experience. The Wireless Forms Entries grid has been updated with a new layout that includes the latest development components available, offering more capabilities, better data manipulation, and performance.
Benefits- Users can add form fields as columns to the grid.
- Improved search options and grouping capabilities.
- The ability to export form data displayed in the screen.
- Have a quick view of where the form was submitted on a map.
- Managers of a car rental company need a quick way to see all additional requests made per car type and region at the end of the day. Currently, they run an Entry details report using custom search conditions. This report is useful when printing or saving certain form submissions, but they need a more efficient way to rapidly find and display the information needed. The improved Entries grid allows them to add the desired fields as columns to the grid, enter the car type or region, and view all entries that match. Plus, they can group by columns to better refine the search.
- ABC Inc. has an Incident Report form completed by agents in the field. Every week they need to provide their insurance agency with a list of incidents involving property damage and injury information. They have asked for the ability to add a few form fields as columns to the grid. This will allow them to quickly filter submissions based on the “Treatment required” field and export the list of incidents as a CSV file.

The upgraded Form Entries grid has a similar look than the existing Alert history screen. There is a Search panel on the left with the grid view to the right, and the initial load will pull the last 50 submissions completed based on current user group assignment.

The Search panel
Users can filter the results in the grid by Entry number, Users or Groups, Reviewed or Not reviewed, and Date range.
The Search box
As users type into the Search box, the search engine will filter table cells matching the characters entered, meaning every cell containing the entered characters sequence will return values, no matter the field type. It can be a number field, drop-down, time, etc.
CSV Export
The exported CSV file will contain all the information displayed in the grid.
View Map/Close Map
The Map view option will show where the submissions occurred, with the list of submissions on the left panel and the map to the right. Users can scroll through the entries and interact with the map.

Optional Columns
- Entry number
- Shared link
- Start time - User local time when the form was started
- Latitude
- Longitude
- Duration - Duration of the form in HH:MM format
- User Group - Based on user who created the form
- Employee number - Based on user who created the form
- Reviewed by
- Reviewed date
- Form Fields - See section below
Add form fields as optional columns to the Entries grid:
Users can add form fields as columns to the grid, following the current field arrangement in the published version of the module.
All field types are allowed except the following:
- Label
- Camera
- Signature
- Audio
- Repeatable
- Table
Groupable Columns
- User name
- Reviewed
- User Group
- Employee number
- Reviewed by
- Form Fields
ORDER SCREEN UPDATE
We have improved the dispatching module with a streamlined order creation process. To make this possible, a few changes were made to the layout and labels on the Order creation screen.
Benefits- Provides a more efficient order creation process.
- Allows for the implementation of dual destination orders in the near future.
- At many times during the order creation process, users select a client and user and try to save the order without selecting a service. Users inadvertently overlook the service field due to its placement at the bottom of the screen, when there are many client detail fields set up. The new screen layout moves the service selection field to a more prominent position at the top of the order entry screen. This makes it more obvious that you have to select a service before saving the order.
- Multiple customers have requested the ability to have two addresses in an order for pick-up and drop-off. In preparation for this feature, we’ve introduced a new compact read-only address section in the drawer. This allows for the future addition of multiple addresses in orders.
The following modifications have been made in the Order creation drawer:
- The Client Information section has been relabeled as Order Information and the New client checkbox has been replaced by a hyperlink.

- When New client is selected, a simplified Client creation screen will pop up, allowing the user to enter the client name, address, and contact information and save it to the new order.
- Selecting a client from the list will populate the Address section with a new compact read only style, as depicted in the image below. Also note the Edit option right below Open address book, where users can quickly modify the address presented.

- The Service selector has been placed right below the Client field. If the service selected has service fields configured, the Services details section will be displayed, otherwise it will not show.

SHOW ORDER HISTORY
When customers have more data available, they have more control over their businesses. The Order history provides users, especially supervisors, with a powerful tool to monitor how field users and dispatchers are handling orders. The new feature adds more visibility and transparency over the multiple changes that can happen after order creation.
Benefits- It’s a great tool for managers to supervise dispatchers and resolve different types of dispatch-related situations.
- Provides a detailed history timeline of the order, including all types of changes.
- Currently, the order history shows a list of status changes, but doesn’t always identify the user who made the status change. Many customers have requested the ability to see who made the status change and when the change was made. The Order Change History feature provides this information.
- Different dispatchers in a company assign and reassign users. They also modify the values of client fields frequently. Their manager needs to see what changes were made and who made each change. The Order Change History feature provides a detailed audit trail report of all changes.
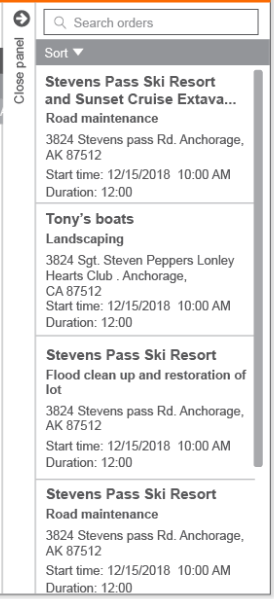
Show history has been added as a new choice in the order Options selector at the bottom of the order drawer:

Once selected, a report style screen will pop up displaying the detailed history of modifications made to the order (from the time of creation to present).
n the same way as other sections where we have added a history of changes, the report shows information in descending chronological order, arranged from the latest and most recent one at the top to the oldest one at the bottom.

From the previous Order update history, we can see the following changes were made:
- User Admin Demo created the order on 3/27/2023 at 4:27 p.m. A list of fields affected during the order creation is included.
- User Admin Demo assigned the order to user Carlos Novak at 4:27 p.m.
- User Carlos Novak changed status to “In Progress” on 3/28/2023 at 9:23 a.m., and a minute later submitted the status form containing “Text field” = Red code, “Number field” = 10.
- User Carlos Novak changed order status to Complete at 9:27 a.m.
Important notes for the Order update history:
- Camera fields will store the record ID and notes, if entered.
- Signature fields will display the record Id.
- Audio fields store the audio record time.
- Attachment fields show file name and size.
- Changes made through the Customer API will show as made by user Customer API.
ORDERS COMPACT VIEW IN MOBILE APP
Mobile users can see a list of orders assigned to them on the app’s Dispatch screen, including a preview of certain order fields. The new enhancements make it possible for companies to customize the information displayed. It’s possible now to display client details fields in the order preview and choose a compact view.
Benefits- The enhancements increase efficiency by saving time for employees in the field.
- Mobile users can set how much preview information they want to see in the orders list.
A delivery company using our job dispatch needs to provide their employees in the field with a quick way to read pickup instructions. Workers in the field sort their day based on the complexity of pickup instructions, from simple to complicated deliveries. Previously, workers had to open the order details and scroll down to the Client details section. They needed an easier way to see those instructions without having to open every order. The new Show on handsets order list option, combined with the Compact view, provides the perfect solution.
Video
a) The Compact view.
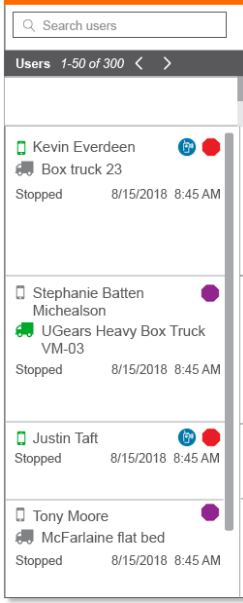
Users can now switch to a Compact view on the order list. The setting is found in the mobile app menu, right after the sorting option (as depicted below). Once you tap this option, the app will hide the Address Information, Reference # and Distance to the location to all orders in the list, and only display the first two rows containing Client Name, Status Name, Order # and Start Time.


Selecting Default view in the menu will revert back to the regular view with full order information.
The setting is locally stored at the user level on the device, so it’s kept between login sessions.
b) Displaying Clients detail fields in the mobile orders list.
In conjunction with the previous option, it is possible now to show Client custom fields on the order list preview in the mobile application, as opposed to just in the details view.
Steps to display Client details fields in the orders list:
- Go to the Clients details section in the Dispatching module of the Web application and Edit the Client details field you are looking to add to the orders list preview.
- Select Show on handset order list and Save.
- Once a change is made in Client details field (enable or disable), the change will only reflect to a user's app when a new order is dispatched to the user. It will also reflect in all mobile users if a module change in Dispatching>Module settings is published.

The image below depicts the Client details fields in the order list for both Default and Compact views:


ENHANCEMENTS
FIELD CONSTRAINTS IN TEXT FIELDS
We have received several requests from customers who want to restrict certain character types when their employees fill out Wireless Forms. This enhancement allows users to configure restrictions for data entry in text fields.
Benefits- It gives more control to managers over data input in Wireless Forms.
- It minimizes errors during data collection, saving the time invested in correcting form submissions.
Company A is exporting a form Ad Hoc report in CSV format and importing the file into another system. They are facing problems when field users type commas in the Summary text field, because this causes data to land in the wrong columns during the import. They have tried workarounds but are still having issues with shifted column data. To resolve the issue, they have enabled field constraints that prevent users from typing special characters in the field.
TrainingEnable field constraints has been added as a new choice to the Text field configuration in the form builder.
Once enabled, a list of character types will be presented, giving the user the possibility to uncheck the ones to prohibit during text input. The options are Letters, Numbers, Special characters and Spaces.
There is also a choice to Set a character limit by entering the maximum number of characters permitted.

Text field constraints are available in Wireless Forms, Timekeeping forms, Service forms, and Status forms.
EXTERNAL POWER APPLIED/REMOVED EVENT
A new type of tracking device event has been added to our system. External Power Applied/Removed is a useful notification sent by the unit every time it loses or gets voltage on its primary power input. The event is useful to investigate tracking issues caused by wiring issues and alert customers on time so they can diagnose and solve the problem.
Benefits- The presence of the events in the vehicle history allows fleet customers to diagnose wiring issues.
- The external power alert notification minimizes the time between the issue occurrence and its resolution.
A trucking company has installed several TTU2830 devices in their fleet and has noticed one of the units has not reported since last week. They have called our Tech Support department, who found that the device stopped tracking after a change in the tracking rate and a few low internal battery events. Following the instructions from our agent, the mechanic discovered that a loose wire was the cause of the issue. The addition of the new External Power Removed event makes it possible to recognize the events in the Vehicle history and notify the customer with an email alert as soon as the event happens.
TrainingExternal Power events showing in the Vehicle history:

The External Power events have been added to the Vehicle event alerts:

Example of an External Power removed email alert:

A section of the Event details report found in Tracking > Fleet reports showing External power applied and removed as events available:

The Alert details report displaying the new vehicle events:

ADDITIONAL USER EVENTS ALERTS
We recently introduced a new capability to capture and display termination events when the mobile app stops working, but events are only displayed in the History details grid. We are happy to announce the inclusion of additional user events in the Alerts section and the new Event details report.
Benefits- Customers can set up alerts for app termination events.
- The Event details report provides a comprehensive way to investigate mobile tracking issues.
- Company ABC Inc. is currently investigating tracking issues in one of their divisions. At present, they are reviewing the user history details for each of the employees, exporting the history, and sorting the file in order to locate the termination events. This is a time-consuming task that can be simplified with the new Event details report. Customers can simply choose the date range, users or groups, and events, and run the report.
- The group supervisor needs a way to receive a notification each time the mobile application is terminated and act as soon as possible. So far, he has been able to detect some instances of manual app terminations with the help of a transmission timeout alert and then looking at the user history details. He is looking for a more effective way to know when these events occur. Now, they can set up application termination event alerts and receive notifications by email as soon as the event is received in our back end.
Additional user events in Tracking > Alerts.
The following user event types have been added to the list of events available to select from: Handset Startup, Manual application termination, Automatic application termination, Doze start, and Doze end.

The Alert details report has been updated to include the new user events:

Alert emails also include the new user events:

EVENT DETAILS REPORT FOR USERS
Reports are essential to monitor business performance over time, make better business decisions, and drive improvements. Previously, we had an Event details report for Vehicle events. For consistency, a similar report has been added for Users.
Benefits- The report is easier to understand compared to scrolling though the history while looking for certain events.
- Managers can set up scheduled reports to be received periodically by email to help monitor user behavior.
The new Event details report has been added to the list of available reports in Tracking > User reports. It provides detailed information about events recorded by the user’s mobile app in a date range. You can choose to view data for some or all users or groups and select specific events or all events.
List of supported events:
- Handset startup
- GPS disabled
- Manual application termination
- Automatic application termination
- Doze start
- Doze end
- Logged in
- Logged out

Example of the new Event details report:

ALERTS API
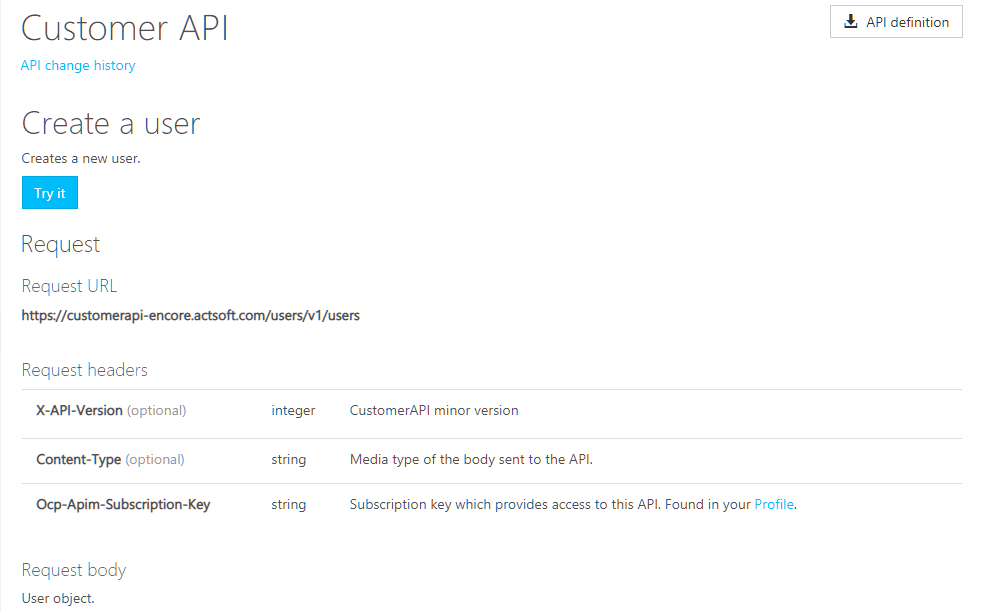
Our Customer API makes it easier for customers to access the data they need. For this reason, we keep expanding the endpoint options available to our users. The new Alerts API enables customers with the ability to pull alert records from our platform and use them in their own system as necessary.
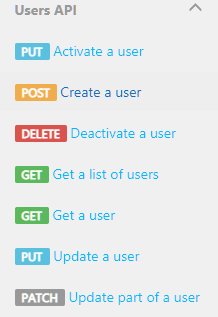
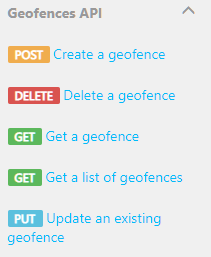
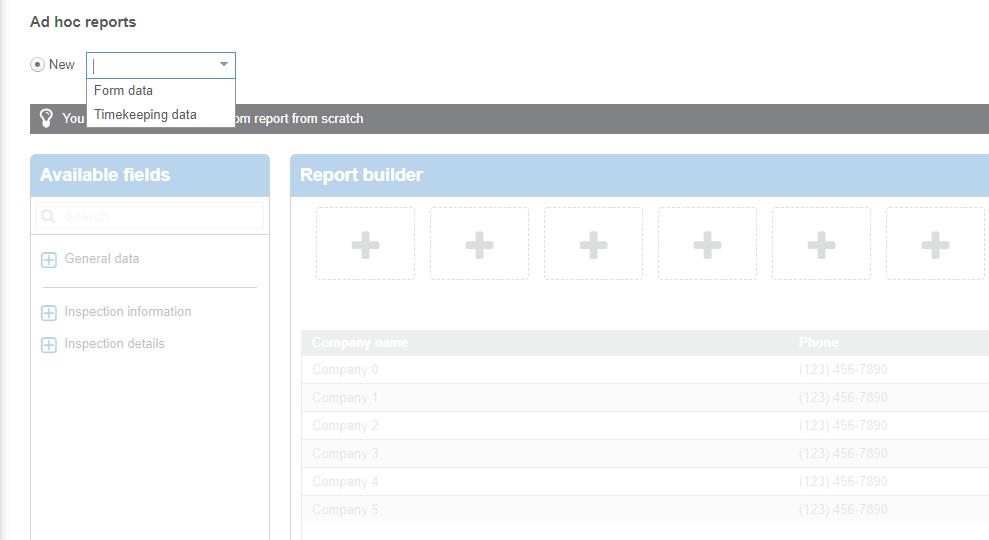
TrainingThe new options available in Customer API – V2 are:
Get a list of alert web hook subscriptions
Retrieves a list of alert web hook subscriptions. You can specify the number of pages returned and the number of elements per page. Results are automatically sorted by SubscriptionId, and in ascending order. Sort parameters are not configurable.
Get a list of alerts
Retrieves a list of alerts based on selected parameters. Date range and page number/size are required. All other parameters are optional. Either none or one of userId, userGroupId, employeeNumber, vehicleId, vehicleGroupId, and vehicleNumber can be specified.
Get an Alert
Returns the alert object based on the alertId.
Resets alert web hook subscription status
Changes subscription status to the status = 1 ("Running")
Subscribe to alerts web hook
Adds new alerts web hook subscription. Web hooks allow you to receive automatic notifications on company alerts occurring on a specified URL.
Unsubscribe from alerts web hook
Deletes an alerts web hook subscription by its ID.


 Actsoft partnered with Odin to provide our solutions overseas, through payment processing integrations. Odin helps us support user management for our software; customers can also purchase our products through Odin’s billing platform.

 VisTracks powers our Electronic Logging Device (ELD) solution, which enables transportation businesses to easily automate their hours of service logs, remain in governmental compliance, and reduce their potential to incur costly fines.
 Integration between Actsoft solutions and BeWhere’s software products is available. Take your team’s asset tracking, cellular data connectivity, and field insight a step further with effective, cross-application compatibility.
 CalAmp tracking devices for vehicles and assets alike are compatible with Actsoft solutions, making it easy for you to efficiently monitor your equipment and fleet cars. Help your team enhance accountability, safety, and savings through a combination of easily installed hardware and intuitive software.
 Gain even greater insight into the daily activities of your fleet using the combination of Geotab and Actsoft. Geotab devices provide detailed data collection and seamless integration with our solutions; learn more about the ways your vehicles are being used daily with the power of this tandem.
 Our partnership with Uniden is ideal for companies looking to gain advanced diagnostics on their fleets. Uniden’s extensive product listing of car electronics like radios, dash cams, radar detectors, and in-vehicle communicators work in concert with Actsoft’s solutions to better connect your vehicles to the company headquarters.
 Kyocera offers a wide range of mobile devices, ranging in design from traditional phones to ultra-durable handset technology. Actsoft is able to equip organizations in a variety of different industries with solutions for improved business, while Kyocera supplies the technology they can flawlessly operate on.

 Motorola’s mobile technology works in tandem with our solutions to provide extra versatility to your business practices. Coupled with our software’s features, Motorola’s reliable devices make connecting your workforce simpler than ever to do.
 Actsoft and Sanyo teamed up to merge intuitive business management software with the technology of today. This partnership allows us to provide you with all the tools your team needs for improved workflows, better coordination, and optimized productivity.
 We’re able to bundle certain solutions of ours (including our Electronic Visit Verification options) with Samsung devices to help your team achieve as much functionality as possible, while keeping rates affordable. Use these combinations for accurate recordkeeping, improved communication, and smarter data collection in the field.
 Our software is the perfect complement to Apple’s user-friendly technology. Equip your workforce with the devices and solutions it needs for optimized productivity during daily operations with Apple and Actsoft.