
New Features Sharpen TeamWherx More Than Before
EDIT STATUS FORM DATA
One of the key benefits of our Dispatching module is that field users can submit a form with details about the work performed.Sometimes incorrect information can be entered in the forms. Previously, there was no option to rectify errors. For this reason, we introduced the ability for web users to edit data submitted in status forms.
Use CaseA company has technicians who work in the field performing repairs. They often make mistakes when entering data into order status forms on the mobile application. Previously, there has not been a way to correct the errors to the submitted form data, which results in extra time and effort. Now they can open the submitted form, view the data, and make changes to the fields (if necessary).
Benefits- Web users can correct status form data collected in the field.

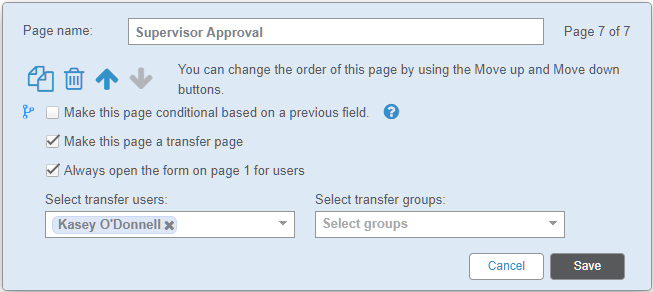
Power Users and administrators can edit submitted status forms in the web portal. The Edit button is located at the bottom right of the status form, similar to Wireless Forms.
To edit status form data, open the desired order, expand the status form in the History section, and select Edit. Once the changes are made, you can hit Save to close the editing screen.
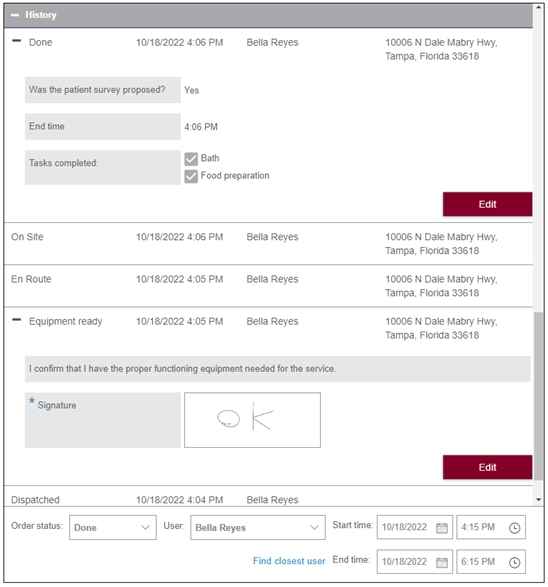
The new feature applies to all field types except Audio fields. Camera fields can be deleted or replaced by a new image uploaded from the computer. Signature fields can be deleted and a new signature can be drawn. Audio fields cannot be edited.
Note: Creating a new status form in the web portal is out of the scope of this release. Only submitted forms with data can be edited.
WIRELESS FORMS SUBMISISON HISTORY
After a Wireless Form is initially submitted, Web Users can make corrections to the data received or add missing information. Customers have asked us for a way to audit those changes, as they need to know more about what changes have been made, who made the changes and when. This new feature makes it possible to get a history of changes.
Use CaseA home health care provider requires employees to submit expense forms. These forms must be marked as “reviewed” in order for reimbursement to be processed. The company wants to be able to see if any changes were made to submitted data and view who marked the form as “reviewed.” They can now open the submitted form, select the Show history option, and view a report that displays any changes made to the form, when the change was made, and the name of the user who made the change.
Video
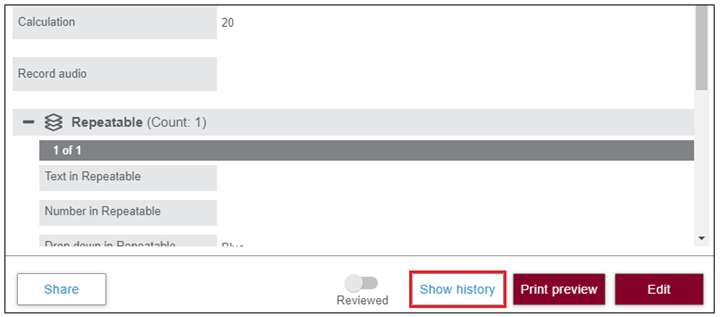
The image below depicts the Show history button added to the form entry footer among the rest of the available actions.
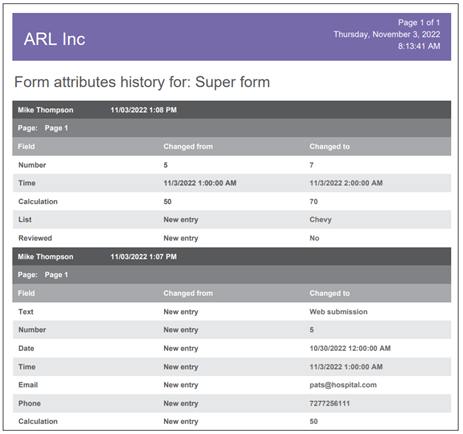
Once Show history is selected, a report style screen will open containing the audit trail for all changes made to the form since its original submission.
The report contains the name of the user who made the change, the time, and three columns displaying the nature of the modifications: Field, Changed from, and Changed to.
AD HOC REPORTS OWNER
At the moment only administrators are able to create and manage Ad Hoc Reports, which is a limitation for some customers. In this new release, we expanded the privilege to Basic and Power Users by adding the concept of Report Owner.
Benefits- Different permission levels can create and manage Ad Hoc Reports.
- Regular Web Users can build their own reports and pull important data without providing them with full admin access.
- This makes it more flexible for companies with multiple divisions to manage and maintain their reports.
- Users can copy an existing report, saving time spent creating a new one.
- It’s easier to make companywide reports available to everyone in the organization.
Every user logged in to the web application will have access to the Administrative > Ad Hoc Reports section, regardless of their role.
Users can create and edit their own reports and also run companywide reports (reports with No Owner).
Data displayed in reports will correspond to their access, according to group assignment, having the same visibility as in the Wireless Forms Entries section.
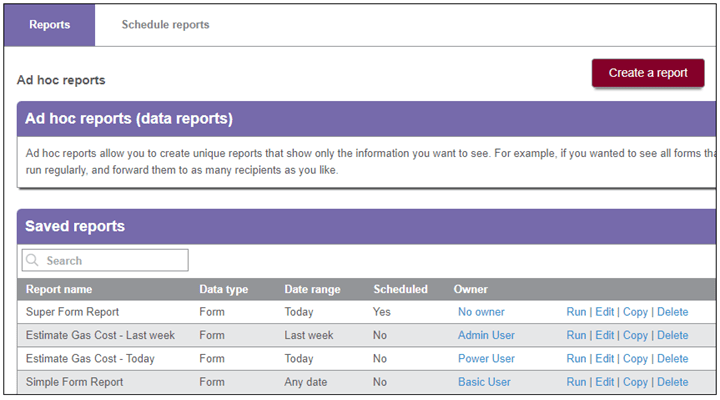
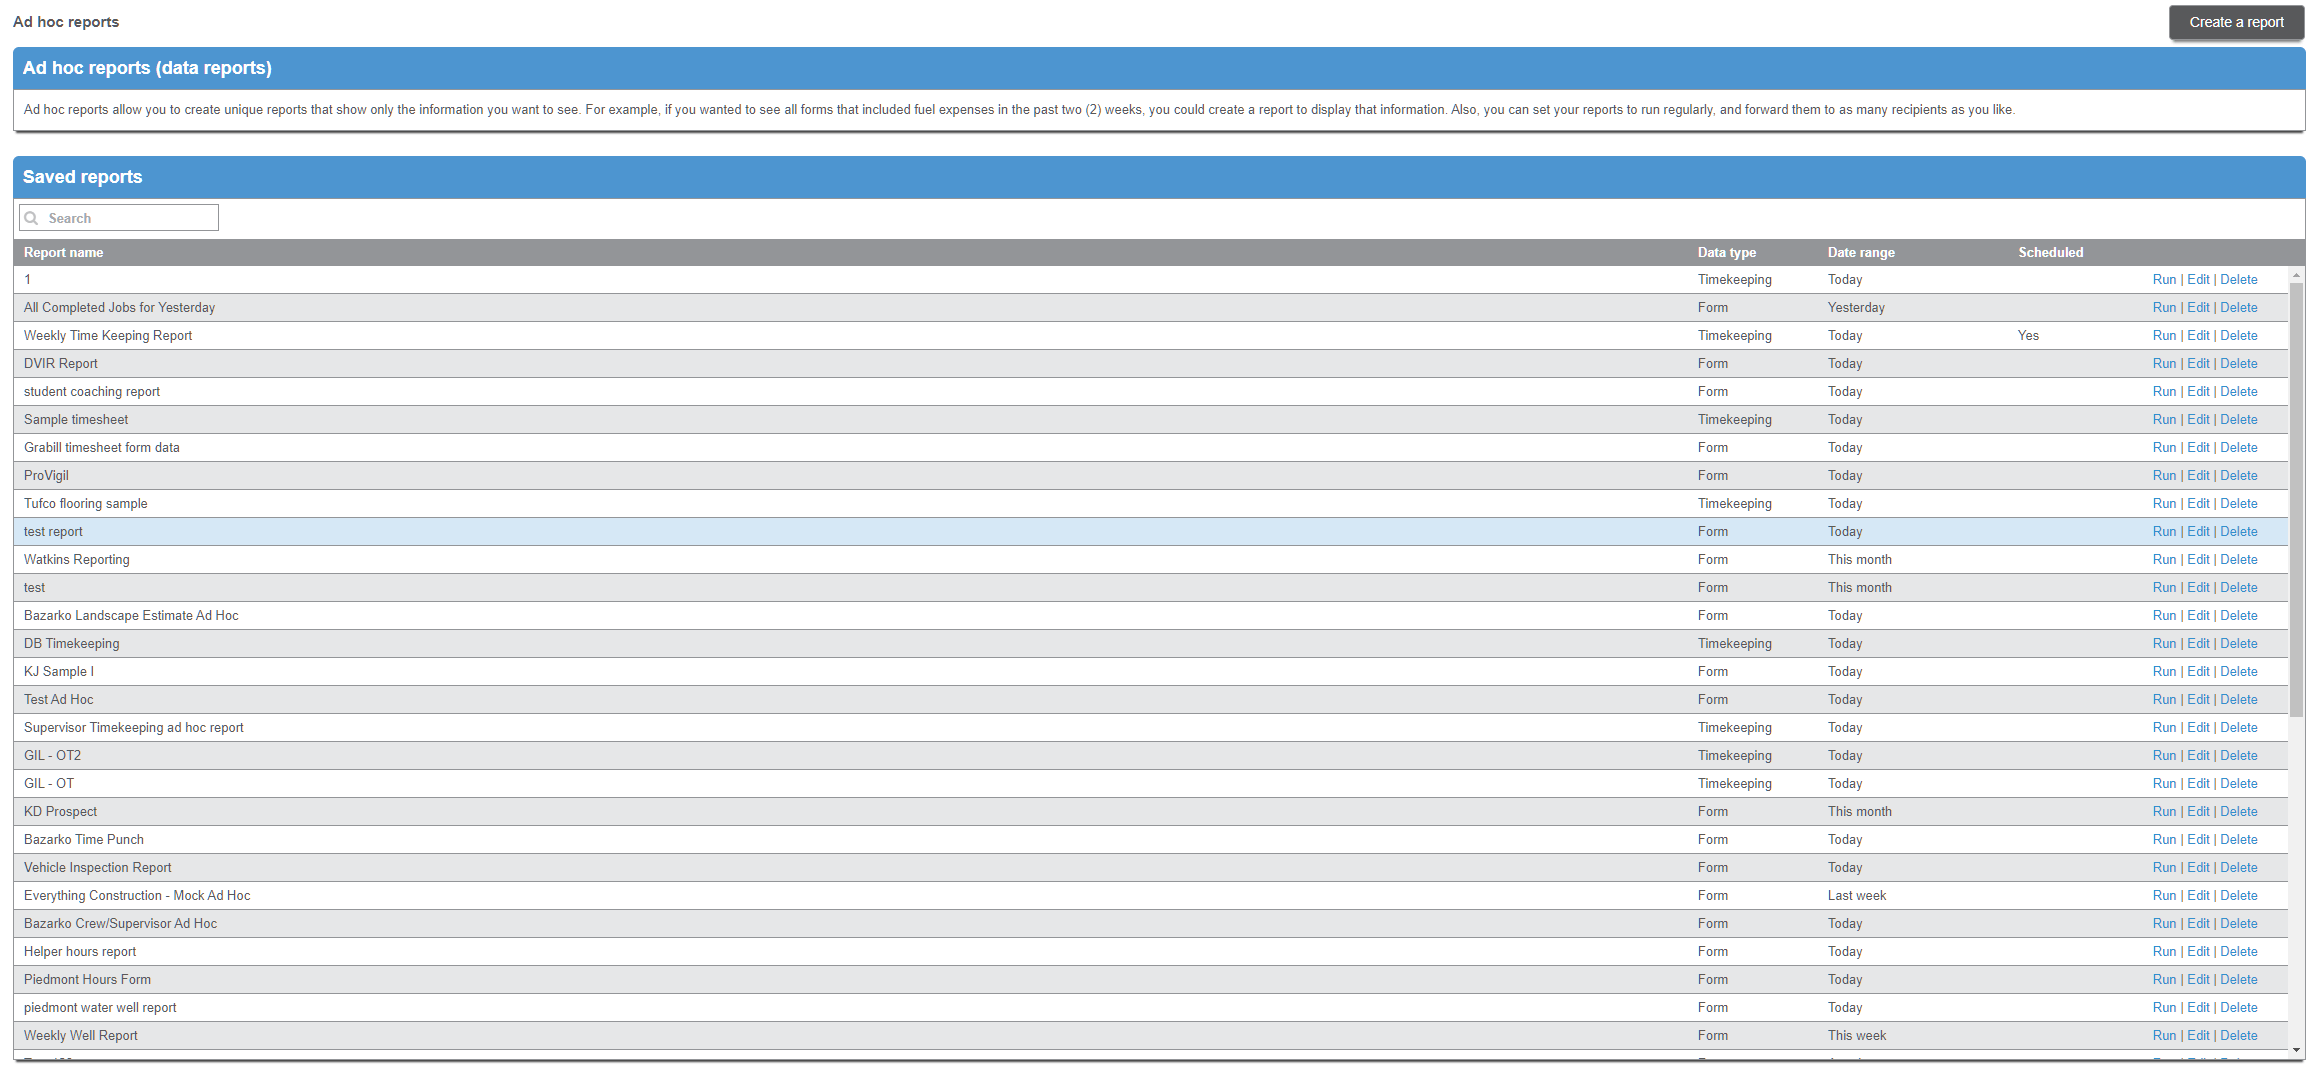
A new Owner column has been added to the Ad Hoc Reports screen to identify the user who owns the report. A user becomes the report owner by creating a report or receiving ownership over the report from an administrator (meaning the report was not necessarily created by the current owner at first).
Being a report owner does not override group assignments. So, if a user receives ownership of a report, they will need to have visibility of the desired data in the Group settings to get results.
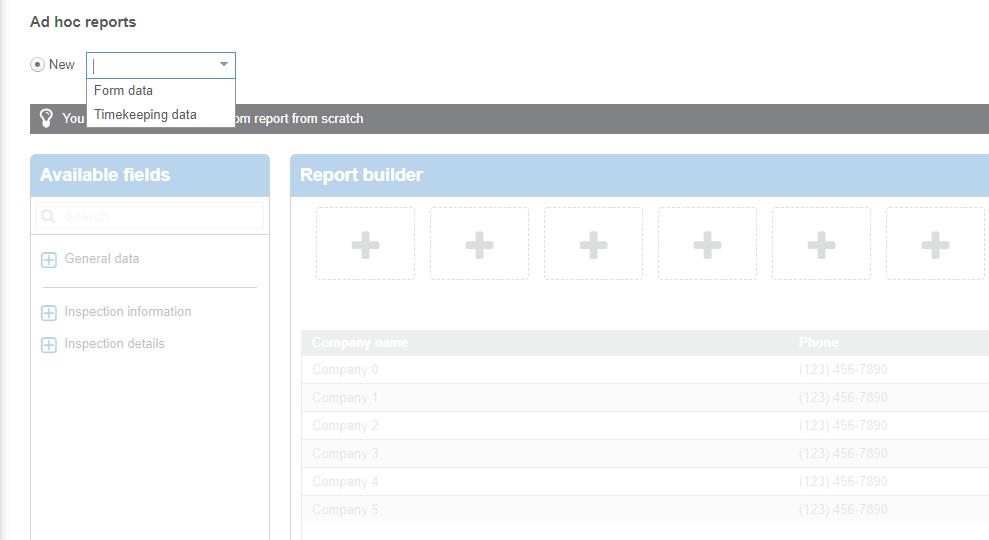
A Copy option was added to the available actions to do on any report, making it possible to replicate an existing report. Once selected, the report builder screen will open for the user to make changes and save as a new report under their ownership.
Example of the Ad Hoc Reports view for an Administrator:
View for a Power User:

View for a Basic User:

Clicking on the Owner name will allow Administrators to make the report available to everyone or choose a user from the list.
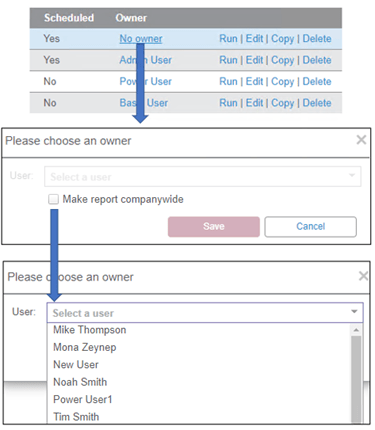
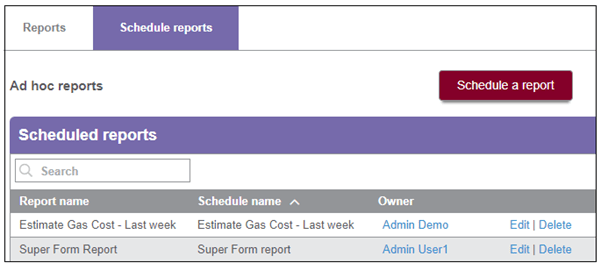
Schedule reports cannot be companywide. There will always be an owner assigned. Admins can still modify ownership.
SEARCH CONDITIONS IN FORM REPORTS
magine you can narrow down your Wireless Forms search by entering a specific field value like “Division” contains “Florida”.Good news! It’s now possible to run a report with specific search parameters in Wireless Form reports. Users can run on-demand reports based on general form information and specific field values.
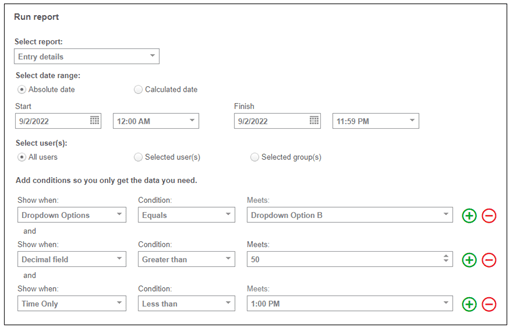
Use Case- An environmental services company wants to run a report that will provide data and photos from all forms submitted with a specific job number in a single report. To accomplish this, they run a report and add a condition. They select the job number form field, set the condition to “equals” and enter the specific number. A report is generated that includes all forms submitted with the designated job number.
- A carpet cleaning company wants to run a report that shows jobs with an invoice total between $500 and $700. The invoice total is a calculated field on the form. To accomplish this, they run a report and add conditions. They select the invoice total form field, set the condition for the minimum amount to greater than $500. They add another condition for the maximum invoice total amount of $700.
To run a report with conditions, go to the desired Wireless Form report and start adding conditions in the new section: Add conditions so you only get the data you need.
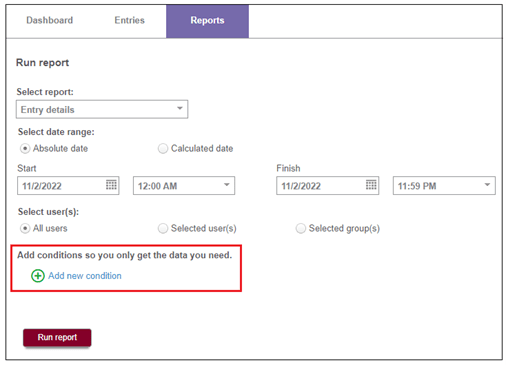
Once a new condition has been added, you can define the Field, Condition, and Value.
This is a very similar concept to how conditions work in Ad Hoc Reports.
A list of the general form information fields available in a conditional search:
- Full name
- First name
- Last name
- Group
- Form start time
- Form submission time
A list of form field types and operations available in a conditional search:
- Text Field
- Equals
- Contains
- Number/Currency/Calculation Field
- Equals
- Does not equal
- Greater than
- Greater than or equal
- Less than
- Less than or equal
- Checkbox/Dropdown/Radio
- Equals
- Phone Number
- Equals
- Contains
- Date/Time field
- Equals
- Does not equal
- Greater than
- Greater than or equal
- Less than
- Less than or equal
- Email
- Equals
- Contains
The following field types are not supported in conditional search:
- Label
- Camera
- Signature
- Audio
- Repeatable
- Table
There are a maximum of 10 conditions defined for a report or scheduled report.
Similar to the functionality in Ad Hoc Reports, all conditions added are connected with the AND logical function. As a consequence, results will meet each one of the conditions.
Timekeeping reports, as well as List and Scan fields, are out of scope in this release.
MOBILE APP TERMINATION EVENTS
Troubleshooting tracking issues related to the mobile application can be challenging due to the different factors involved, and in some cases, can take many hours from our Actsoft personnel (plus valuable customer time). To mitigate this trouble, we have introduced a new capability to capture and display termination events when the app stops working.
One of the reasons for the termination can be users forcing the mobile application to close. Another cause could be the app being automatically terminated by the device’s operating system due to battery saving settings.
Benefits- Companies can get a clearer idea of their employees’ behavior and enforce policies that help correct their conduct.
- An assessment of these events can help identify mobile devices which are improperly configured.
- The feature saves time for our Support personnel when they’re investigating mobile tracking issues.
The following app terminated events will be captured in the mobile application and displayed in the User activity details grid.
iOS: Manual application closeThe event is generated when the app is swiped up from the app manager screen and will display in history after an app restart (with the timestamp of termination).
Android: Manual application closeFor OS 11 +, the event is captured when the application is closed using the Force stop option in App info. This will display in history after an app restart (with the timestamp of termination).
Doze Start and Doze EndIntelligent Tracking may be impacted by the Android Doze mode, which is a power-saving feature to extend phone battery life. Doze kicks in when a device is unplugged and stationary for a period of time (with the screen off). Under these conditions, the system attempts to conserve battery by restricting apps, entering into a deep sleep mode and waking up periodically to allow certain high-priority activities.
Doze events are generated in our mobile app when the device enters or comes out of the deep doze mode, due to battery saving features enabled on the device. The handset can be configured to prevent the app from entering Doze, thus eliminating gaps in history.
The image below shows sections of the History details containing the termination events for an Android device.
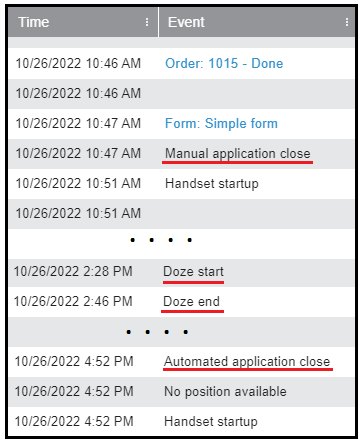
Explanation of events:
10:47 a.m. – The user force stopped the application and a Manual application close event was captured.
10:51 a.m. – The user started the application and the Manual application close event was transmitted.
2:28 p.m. – The Doze start event was generated sometime after the user enabled power saving on the phone.
2:46 p.m. – The Doze end event was generated by a user interacting with the phone.
4:52 p.m. – A battery optimization setting caused the app to be terminated and the Automated application close event was captured.
4:52 p.m. – A user started the application, and the Automated application close event was sent to the backend.
Notes:
- The initial scope of this feature does not include trying to generate alerts from these events.
- Termination events will only be displayed in the History details grid (not in the Timeline).
ENHANCEMENTS
REPORTS CUSTOM DATE RANGE
At present, reports can be run with a calculated date range of Today, Yesterday, This week, Last week, This month, and Last month. We have now added the option of a Custom date range that allows a more variable time span.
Benefits- User will have more flexible date ranges in their reports.
- Custom reports benefit from this enhancement, as users can get the information they need by just entering the number of previous days.
- A landscaping company needs to review timekeeping data for hours worked during a non-standard work week. They want to run a report every Monday morning that will include the timekeeping data from the previous Monday through Sunday pay period. To accomplish this, they create a scheduled report set to run weekly and set the date range parameters to Custom. Entering a “From” date range of “7 days ago” and an end date of “1 day ago” will generate a report for the previous Monday through Friday.
- A waste management company needs to monitor the number of hours worked to determine the users that are approaching overtime status prior to setting work schedules. They want to generate a timekeeping report to see the number of hours worked after the first five days of a seven-day payroll period to run after close of business on the fifth day. They run a timekeeping report with a Custom date range and parameters of “From 4 days ago” to “0 days ago.” This produces a report that shows timekeeping data for a five-day period, up to and including the current day.
The new Custom option has been added to the drop-down in the Calculated date section.
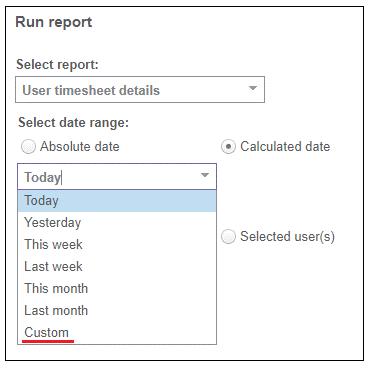
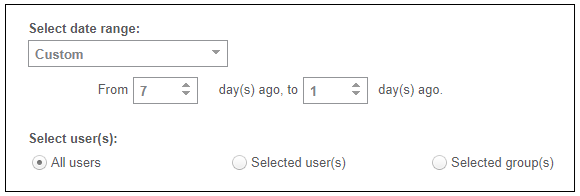
Selecting Custom in the date range selector will allow you to input “From” and “To” values in numbers of days. A number one (1) represents “Yesterday” and a number zero (0) represents “Today.” The “From” time is hardcoded to 00:00 and the “To” time to 23:59.
 Example # 1:
Today is Monday, August 8. Running a custom report for last week from Monday, August 1 to Sunday, August 7 will be represented as: “From 7 day(s) ago” to “1 day(s) ago.”
Example # 2:Scheduling a report to run Friday night at 20:00 containing the five business days of the week will be represented as: “From 4 day(s) ago” to “0 day(s) ago.”
Example # 3:If a report runs on 6/21 with parameters of "10 days ago” and “0 days”, it will display data from 6/11 00:00 until 6/21 23:59.
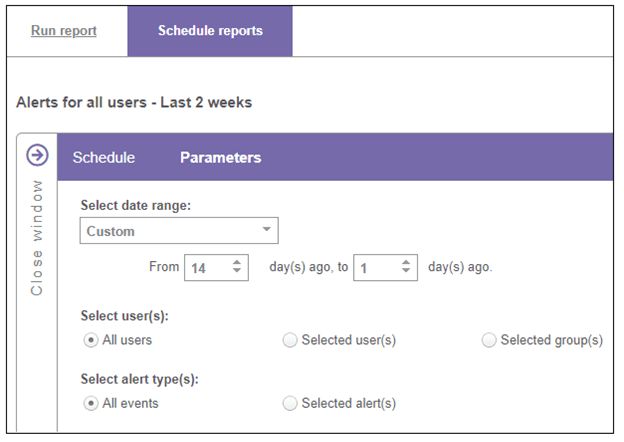
A custom date range in Schedule reports.
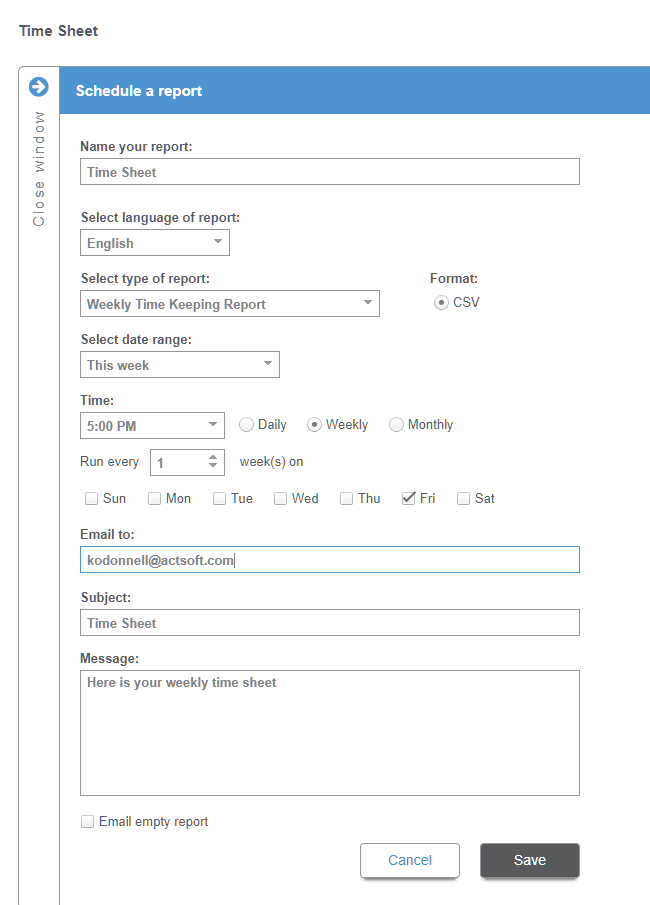
ADDITIONAL FILE FORMAT FOR SCHEDULE REPORTS
Customer expectations are always evolving. As a result, we have received multiple requests asking to get the file attachment for schedule reports in different formats.
A Text file (.TXT) is a plain text file that stores data as a series of alphanumeric characters and does not contain special formatting.TXT files can be opened using a notepad present on all modern computers and are easy to use for end users.
A CSV file (comma separated values) is a special file extension commonly opened with MS Excel. Basically, this is also a plain text file where data is separated with commas. CSV is a simple way to store big data sets and is well known for tabular data storage.
Use CaseA customer has scheduled a timekeeping report to receive time punches and update their payroll system. They now want to use the report files for integration purposes with another application that does not accept PDF and XLSX, since those are proprietary formats unusable for integration unless they are decoded first. Having the possibility to receive the files in Text and CSV gives them an easy way to accomplish the project.
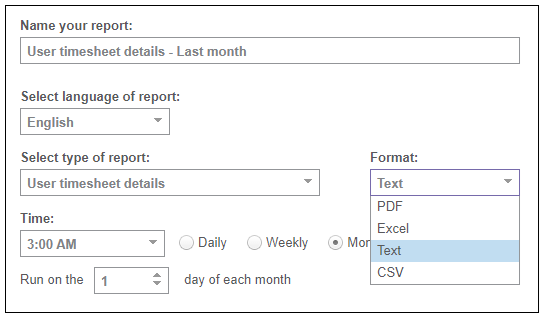
TrainingThe Format selector in the schedule reports screen has become a drop-down containing Text and CSV as file types. Users can now select any of the four options available: PDF, Excel, Text and CSV.
SET A CLIENT AS INACTIVE
To make sure users are getting as much value as possible from our Order Dispatching, we are continuously adding new capabilities. This enhancement makes it possible to set a client as Inactive.
Benefits- Managers can limit order creation for specific clients.
- Companies can have two easily identified lists in the system (one for active and another for inactive clients).
A clinical laboratory services hundreds of clients in their region. The company utilizes the Dispatching module to manage and track their orders. As the company grows, the client base may change, as with most organizations. The ability to deactivate clients allows the dispatchers to see only active clients when assigning orders. This feature also allows the customer to preserve historical data for clients they win back and reactivate.
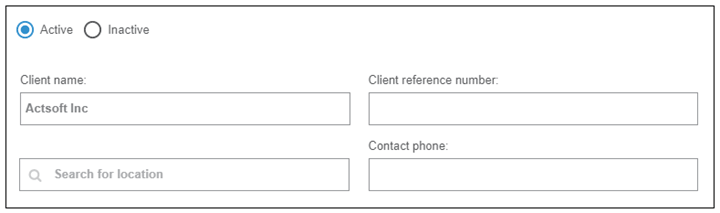
TrainingThe Active/Inactive selector has been added at the top of the Client settings screen.
The following rules apply:
- Users cannot create new orders or new recurring order templates for inactive clients.
- Reactivating a client will not reactivate all recurring orders automatically. Users have to enable templates one by one.
- Deactivating a client will deactivate any recurring work orders linked to the client.
- Existing open orders for inactive clients can still be completed.
- Inactive clients are still displayed in the clients dropdown for Order History and Reports.
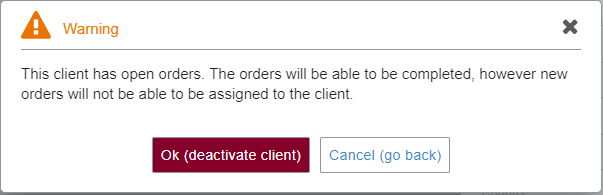
A warning displayed when deactivating a client with open orders.
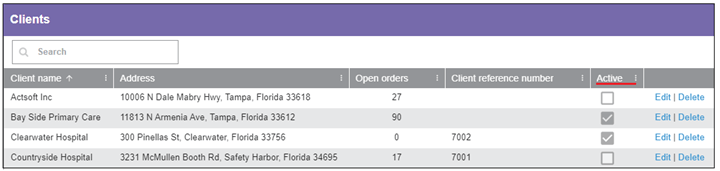
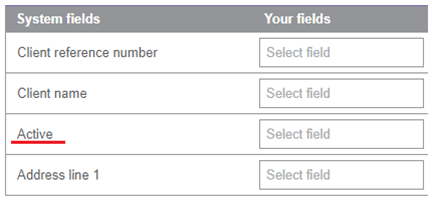
The Clients grid has been modified to show if a client is active or inactive. See the Active column below:
The Active/Inactive client status is available in the Clients import template.
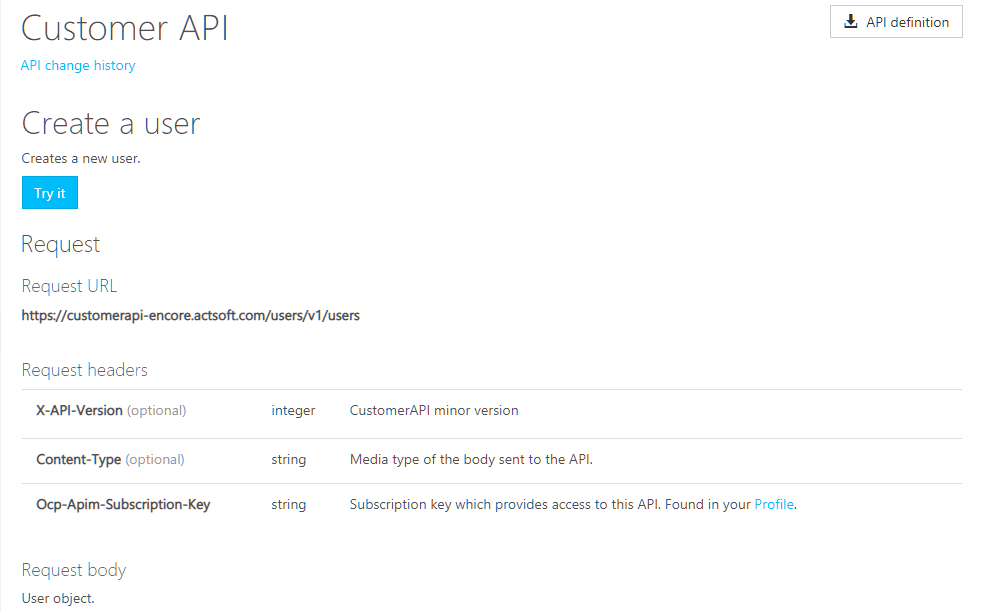
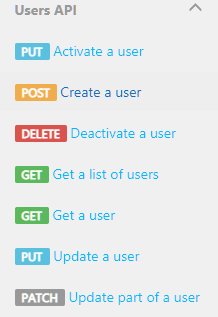
Customer API:
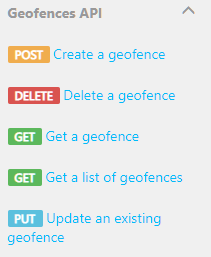
- Client active field has been added to the following V2 Clients endpoints: POST, PUT, GET and GET (list).
ADD CLIENT REFERENCE TO FILE IMPORTER
Our File import feature allows customers to bring in existing data from an external file, avoiding the need to re-enter existing digital information. We have added Client reference number as a new field to the Client import template. The field is an external reference number for clients that customers can map in our system and use in work orders.
Benefits- Customers can add the client reference number during file import.
- It is no longer needed to import the clients list, search for each client and add the reference manually.
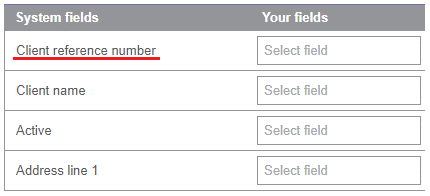
The image below depicts a section of the Client import template with the new Client reference number field.
DELETE TIMEKEEPING RECORDS
We have listened to our customers feedback! From now on, admins and Power Users using the web app have the ability to delete individual timekeeping records. Timekeeping entries are sometimes created in error and need to be deleted, but our platform currently does not allow it.
Benefits- Bad entries no longer show in reports and don’t have to be modified in order to hide them from reports.
- This enhancement helps users keep a clean and organized timekeeping grid.
ABC Company has replaced all their paper timesheets and time clocks with our Mobile Timekeeping solution. A new payroll system was also implemented to receive punches from our app through an API integration. The challenge their accounting department faces is the need to clean bad timekeeping records before they reach the other system. They can now delete time entries in the Timekeeping module.
TrainingA Delete button has been added to the footer of timekeeping records.

Once delete is selected, a warning window will pop up notifying the user that the action is irreversible.
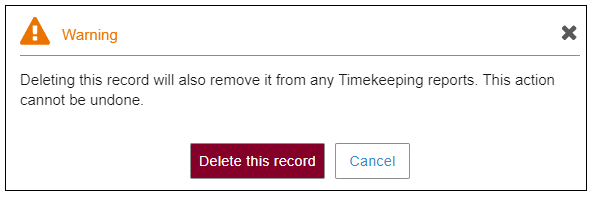
Note: Open timekeeping records cannot be deleted. In order to delete them, they must be in a Clocked out state, regardless of being approved or not.
MULTISELECT IN ORDER REPORTS
Previously, most of the dispatching report parameters accepted selecting one or all available options, limiting users from getting more refined results. We added the capability to select multiple service types, status types, and clients at the time of running the report. This simple but powerful option takes our dispatching reports to the next level of functionality.
Use Case- A medical laboratory services company needs to run a dispatching report that includes more than one client and order status. They want to export the data for use in Excel. Previously, they had to run multiple reports with a single client or status selected. They can now run a report and select multiple clients and multiple statuses.
- A plumbing supply company needs to run a report that shows closed orders for a customer with multiple locations. Each location is set up as a unique client. To include all client locations in the same report, they can now run a report and select multiple clients.
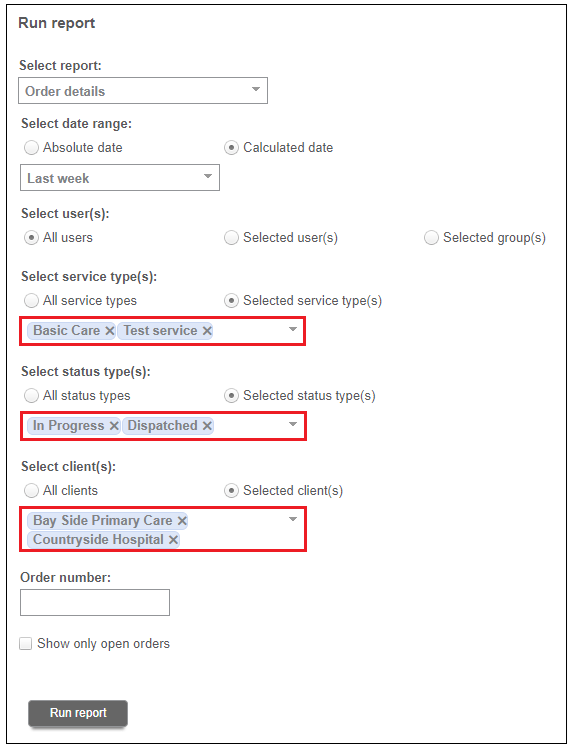
There are no visible changes in the reports screen. We have just enabled the ability for multiple selection in: Select service type, Select status type, and Select client.


 Actsoft partnered with Odin to provide our solutions overseas, through payment processing integrations. Odin helps us support user management for our software; customers can also purchase our products through Odin’s billing platform.

 VisTracks powers our Electronic Logging Device (ELD) solution, which enables transportation businesses to easily automate their hours of service logs, remain in governmental compliance, and reduce their potential to incur costly fines.
 Integration between Actsoft solutions and BeWhere’s software products is available. Take your team’s asset tracking, cellular data connectivity, and field insight a step further with effective, cross-application compatibility.
 CalAmp tracking devices for vehicles and assets alike are compatible with Actsoft solutions, making it easy for you to efficiently monitor your equipment and fleet cars. Help your team enhance accountability, safety, and savings through a combination of easily installed hardware and intuitive software.
 Gain even greater insight into the daily activities of your fleet using the combination of Geotab and Actsoft. Geotab devices provide detailed data collection and seamless integration with our solutions; learn more about the ways your vehicles are being used daily with the power of this tandem.
 Our partnership with Uniden is ideal for companies looking to gain advanced diagnostics on their fleets. Uniden’s extensive product listing of car electronics like radios, dash cams, radar detectors, and in-vehicle communicators work in concert with Actsoft’s solutions to better connect your vehicles to the company headquarters.
 Kyocera offers a wide range of mobile devices, ranging in design from traditional phones to ultra-durable handset technology. Actsoft is able to equip organizations in a variety of different industries with solutions for improved business, while Kyocera supplies the technology they can flawlessly operate on.

 Motorola’s mobile technology works in tandem with our solutions to provide extra versatility to your business practices. Coupled with our software’s features, Motorola’s reliable devices make connecting your workforce simpler than ever to do.
 Actsoft and Sanyo teamed up to merge intuitive business management software with the technology of today. This partnership allows us to provide you with all the tools your team needs for improved workflows, better coordination, and optimized productivity.
 We’re able to bundle certain solutions of ours (including our Electronic Visit Verification options) with Samsung devices to help your team achieve as much functionality as possible, while keeping rates affordable. Use these combinations for accurate recordkeeping, improved communication, and smarter data collection in the field.
 Our software is the perfect complement to Apple’s user-friendly technology. Equip your workforce with the devices and solutions it needs for optimized productivity during daily operations with Apple and Actsoft.