
New Features Sharpen TeamWherx More Than Before
CLIENT ADDRESS BOOK
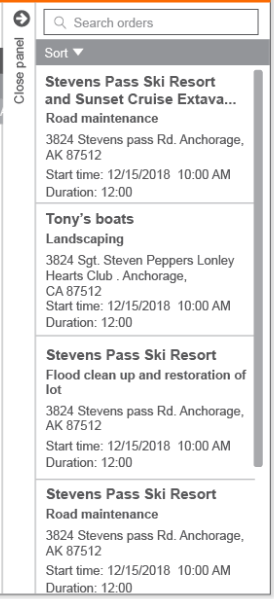
Our orders dispatch has improved! We have added the Client Address Book as a new feature, allowing users to define multiple addresses for one client. In many cases, a single client can have numerous locations where they send employees to perform work orders. All these addresses can now be defined in the Client Address Book and easily selected during order dispatch.
Benefits- Dispatchers can select from different locations under the same client profile.
- A great alternative for companies who are growing their client base rapidly.
- The feature opens the door to include more than one address per order in the future. Stay tuned!

The Client Address Book
The address and contact information part of the Clients drawer has been replaced by a brand-new Address book section, where users can store and manage multiple addresses defined for a client.
The image below depicts the client drawer with a single address, which represents the new Client view customers will see after the update.

Once Add new address is selected, the editing screen will open for the user to enter the new address information. At this time, a name can be assigned to the address, and there is also a checkbox to mark the address as the Default address for new orders. Selecting an address as default will replace the previous default address.

The default address is the address populating upon order creation and also the address displayed in the Address column of the Clients grid:

The image below depicts the Client Address Book with multiple addresses. Users accessing this screen have the ability to edit, delete and add new addresses:

Selecting a New Address During Order Creation:
When creating a new order, the default address will populate, but users can now open the Address Book to select and assign a different address from the list.

Choosing a different address and applying the selection will populate the new address in the order screen.

GRID GROUPING AND PAGE SIZE
We have added the capability to group information in grids by column name. The feature elevates the functionality of our application grids, allowing users to group rows together and organize information as needed. For the moment, grouping by columns is supported on the following screens: Orders, Users, Custom Lists, and Clients.
Benefits- Allows customers to increase the page size and work with a larger set of rows at a time.
- Users can better organize the information in grids by grouping one or multiple columns.
- Saves the time invested in sorting and filtering screens to find the desired information.
- Grouping by columns combined with grid filtering in the Orders screen offers dispatchers a powerful tool.
Grid Page Size Selector
We have added a new grid component to our application that allows users to change the page size from the default 300 rows. This enhancement makes it possible to define the page size in grids and work with a larger set of rows at a time, which helps with certain grid functionalities like editing users, bulk actions on orders, etc.
The rows per page selection control is located at the bottom right of the page, and users can choose among 300 (current default), 1,000, and 2,000 rows per page:

Grouping by a Single Column
Group by (column name) has been added to the list of actions available to columns. Clicking on this option will update the grid view, grouping rows based on the column values and placing the column as the first column in the grid.

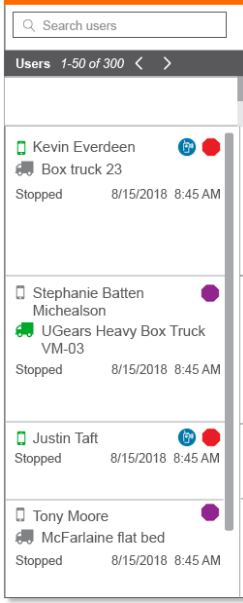
The image below depicts the Users grid grouped by Permissions. As you can see, the number of items in each group is indicated next to the group name.
To end grouping, you can select Stop grouping by (column name). This action will place the column back to its original position in the grid.

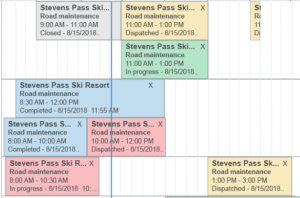
Grouping by Multiple Columns
There can be multiple levels of column grouping. The following image represents the Orders grid grouped by Status, then by Client name.
When grouping by multiple columns, the label of the leftmost column changes from the initial grouped column label to a generic "Group" column label:

Grid Grouping Rules:
- Grouping by a column will sort all records in the grid in ascending order by the column name and move the column to the leftmost side.
- All rows in the grid will be grouped in alphabetical order and the number of records per page will remain the same, depending on the number of rows per page selected
- Additional subgroups may not be sorted alphabetically by default; however, users can sort rows using the standard column sort.
- Grid grouping will persist after a user leaves the grid and returns, and between login sessions.
- Grouping by a binary column value - like the GPS column check box in the Users grid - will be labeled as False (#) or True (#).
- Rows with empty value in the column will show as
(#).
Grouping and Page Size are supported in the following columns, by grid type:
Orders
- Client name
- Service
- Status
- Assigned
- Client details (Text, Dropdown, Numeric)
Users
- Group Member
- Permissions
- Active
- GPS
- License Type
- Mobile Access Only
- Crew Leader
- Require SSO Authentication
- Modified by
Custom List Field Type
- Text
- Numeric
- Date & Time
- Date
- Time
Clients
- Contact name
- Contact email
- Contact phone
- Client Custom Fields
- Text/Drop-Down/Numeric Field Types
Tips:
- In the presence of a large number of records, increasing the page size after grouping will let you see more records in one page.
- Grouping combined with filter by start time can refine your search even more.
FILE ATTACHMENT IN SERVICE FORMS
Several customers have requested the ability to send files of different formats within a work order to mobile users in the field. Therefore, we have come up with a new field type: Attachment fields.Attachment fields in service forms will transport a file uploaded from the dispatcher’s computer to the mobile user’s application. Once the file is received in the mobile app, it can be viewed and downloaded on the handset device.
Benefits- Companies using our dispatching module can send data carried in different file types to their users in the field.
- Multiple files can be attached to the same field.
a) Configuring attachments in a service form.
Go to the Dispatching module setting and add the Attachment field to the desired Service type form.

Once in the field Settings, the user is notified about file size limitations and the file types permitted:

b) Uploading files to the service form.
After the attachment field has been configured, web users will utilize it the same way they currently upload a camera field. Clicking on the attachment icon will invoke the default file explorer from the operating system. Only accepted file types will be available to select from the list:

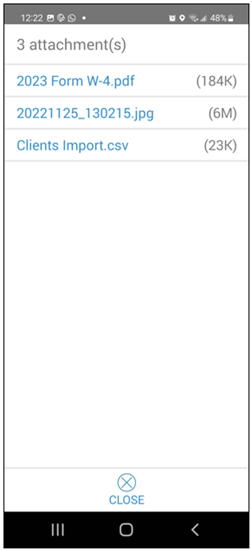
c) Service form with attachments in the mobile app.
As shown below, the attachment field bar is highlighted in light blue and displays the number of files contained in the field.
Tapping on the attachment area will bring you to a separate view displaying the name and size of each file.
Selecting any of the individual files will launch the native browser on the device and allow the user to open and download the file.

Note: In this initial phase, Attachment fields are only available to Service type forms. Wireless Forms and Status forms are not included in this release.
MY MODULES SEARCH AND SORT
Various customers have expressed the need to find modules more easily in the web portal, especially in accounts with a large number of forms. To make this possible, we have upgraded the modules section with search and sort capabilities.
Benefits- Saves time for users, as they can quickly locate a form module by its name.
- No need to scroll through an excessive amount of form modules to find the correct one.
- Sorting modules alphabetically is a great way to organize the screen and locate modules.
The new Search and Sort controls have been placed at the top of the My modules screen:

1- Search
The search option seeks text in the module name and module description; and starts filtering as soon as the user begins typing.
An example of a user looking for a Wireless Form containing “cost” in its name:

Tip: The search function looks for characters, not just text:

2- Sort
The three sort options users can apply are Sort Alphabetically A-Z, Sort Alphabetically Z-A, and Sort by device display order.
At present, modules in the My Modules section are displayed following the same order as in the Device layout, found in the Administrative section of the web portal:

To keep the same module disposition, select Sort by device display order:

Selecting Sort alphabetically allows users to sort all modules in alphabetical order from A to Z, or reverse mode Z to A:

CLOSEST TO FILTER IN LIVE VIEW
We have added a feature to the Live View that makes it possible to find users closest to a location instantly. Web users can now know in real-time who is within the defined range of a specific geofence, user, client, or random address.
Benefits- Easy to use. With a few clicks, you can filter the Live View to only see users within the desired distance.
- Provides an accurate method to find users, compared to having to visually search users on the map.
- Combining Closest To with Filter this list can provide a powerful filtering functionality in the Live View.
Steps to find users closest to a Geofence, User/Vehicle, Client, or Location:
- Select Closest to to open the filter.
- Enable filter.
- Choose from Geofence, User/Vehicle, or Client to bring a list of geofences, users, or clients and pick one from the list. Selecting Location will let you enter an address.
- Adjust the desired maximum distance to the object. By default, there is a 10-mile radius.
- Press Save.

A section of the Live View showing the users panel and filtering options.
Once the selection is saved, the users panel will be filtered to only show users within the specified range, sorting them from closest to furthest.
At the same time, the map will present a geofence-like circle with a central pin in the target address, and the filtered users inside the highlighted area.

As you can see in the image above, the last known position from every user is used in the search without considering the timestamp of the last known position.
Tip: Refine your search more by using the filters available in the Filter this list section.
Finding Users Closest to Users/Vehicles
Selecting User/Vehicle as the target object will populate the address information considering their last known GPS location. If there is no valid GPS location, the system will return the message below:

Finding Users Closest to Clients
If a Client is selected with no address or an unverified address, the pop-up dialog below displays:

ENHANCEMENTS
LIVE VIEW FULL SCREEN MAP
Multiple customers using our Tracking capabilities have requested the ability to turn the Live view map into a full screen view.
TrainingA new full screen mode icon has been added to the top right section of the Live View map. Once selected, the screen will turn into a full screen map hiding the page header and left menu:
Selecting the Full screen mode:

To exit the Full screen mode, click on the button to switch to the map’s Default mode:

Tip: Press F11 on the keyboard to enter a perfect full screen in the web browser without address and status bars:

COPY AND PASTE OPTIONS IN FORM BUILDER
We are always looking for new ways to save time for customers using our platform. The new Copy and Paste functionality enhances our Wireless Forms by facilitating the process of doing changes to selection fields with long lists of values.
TrainingA new Options gear icon has been added to the field settings on Drop-Down, Checkboxes, and Radio fields:

Copy options to clipboard will copy all the values from the field into the clipboard.
Paste options to list will paste all values from the clipboard, giving users the option to Replace all existing values or Add at the end of the list:

CUSTOM CONDITIONS FOR TIMEKEEPING REPORTS
We have expanded the custom search parameters to our Timekeeping Reports. Users now will be able to set one or several conditions and filter the data returned in the report.
Benefits- Saves time for supervisors by decreasing the time needed to revise timekeeping reports.
- Users can run reports based on general form information and individual field values.
To run a report with conditions, select the desired timekeeping report and start adding conditions from the new section Add conditions so you only get the data you need.

Once a new condition has been added, you can define the Field, Condition, and Value. Multiple conditions can be combined to obtain only the desired relevant data.

General data available in conditional search:
- Email address
- Phone number
- Employee number
- Total hours
- Total break time
- Total lunch time
- Net hours
- Approved
Clock in details / Clock out details:
- Geofence name
- Address
- City
- State/Province/Region
- Sub region
- Zip/Postal code
- Latitude
- Longitude
Clock in form fields
Clock out form fields
Form field types and operations available in conditional search:
- Text Field
- Equals
- Contains
- Number/Currency/Calculation Field
- Equals
- Does not equal
- Greater than
- Greater than or equal
- Less than
- Less than or equal
- Checkbox/Drop-Down/Radio
- Equals
- Phone Number
- Equals
- Contains
- Date/Time field
- Equals
- Does not equal
- Greater than
- Greater than or equal
- Less than
- Less than or equal
- Email
- Equals
- Contains
A maximum of 10 conditions can be defined in a report or scheduled report.
Similar to the functionality in Ad Hoc Reports, all conditions added are connected with the AND logical function. As a consequence, results will meet each one of the conditions.
ADDRESS HYPERLINK IN ALERT EMAILS
At present, when an email alert is sent, we provide the address where the violation occurred; however, in order to know more about the location, users typically have to copy and paste the location into Google maps or search the history in our application. The new address hyperlink in alerts eliminates that step.
Benefits- Useful for those who receive an alert email but don’t have access to the application to check the history.
- Allows users to quickly see on a map where the violation occurred.
An example of a Stop alert email received with the address hyperlinked:

Once the user clicks on the blue highlighted text, a new browser tab directed to Google Maps will open, with a pin centered on the coordinates of the alert.
Note: Location will be empty if there is no GPS data available when the violation occurred (for example in the case of a GPS disabled user event alert).
ALERT HISTORY WITH IMPROVED PARAMETERS
Another enhancement made to our web application is in the Alert History screen. We have modified the way parameters are displayed in the Alert details drawer, making them clearer and easier to understand.
Benefits- The new parameters are more relevant, providing users with a better idea of the violation that occurred.
- It saves the time invested by users in researching more about the alert.
The image below depicts the existing Stop alert drawer, showing a descriptive version of the threshold as a parameter, but there is no precise information about how long the user was stopped at the location.

The new Stop alert drawer explicitly provides the threshold set and the time the user was stopped:

List of parameters per Alert type:
Stop Alert
Stopped time: XX hours/XX minutes/XX hours XX minutes
Stop threshold: XX hours/XX minutes/XX hours XX minutes
Timeout Alert
Timeout threshold: XX hours/XX minutes/XX hours XX minutes
Speed Alert
Actual speed: XX MPH
Speed threshold: XX MPH over XX MPH
Posted speed alert
Actual speed: XX MPH
Posted speed: XX MPH
Speed threshold XX MPH over the posted limit.
Idle Alert
Idle time: XX hours/XX minutes/XX hours XX minutes
Idle threshold: XX hours/XX minutes/XX hours XX minutes
User event (No changes)
Event
Vehicle Event (No changes)
Event
Geofence Alert (No changes)
Aggressive driving (No changes)
SHOW ALL RECIPIENTS IN RECEIVED EMAIL
We like to go above and beyond for our customers. A request came from a customer who recently migrated from our Legacy platform. They want to be able to reply to all recipients when a form submission email is received. This allows them to communicate and share comments about the form among all stakeholders.
TrainingExample: The following form is configured to email the three email addresses configured in email settings.

With the current process, the email received only shows the user who received the email as recipient (not giving the option to reply to all recipients defined in the form):

After the new feature is enabled at the account level, the To and Cc fields will display the full list of recipients, allowing users to Reply All:

Note: Email addresses entered manually in form fields are not included in the email chain. They will continue to receive the individual email.
There is no option in the UI to enable this feature. It can only be turned on through the Manager App.


 Actsoft partnered with Odin to provide our solutions overseas, through payment processing integrations. Odin helps us support user management for our software; customers can also purchase our products through Odin’s billing platform.

 VisTracks powers our Electronic Logging Device (ELD) solution, which enables transportation businesses to easily automate their hours of service logs, remain in governmental compliance, and reduce their potential to incur costly fines.
 Integration between Actsoft solutions and BeWhere’s software products is available. Take your team’s asset tracking, cellular data connectivity, and field insight a step further with effective, cross-application compatibility.
 CalAmp tracking devices for vehicles and assets alike are compatible with Actsoft solutions, making it easy for you to efficiently monitor your equipment and fleet cars. Help your team enhance accountability, safety, and savings through a combination of easily installed hardware and intuitive software.
 Gain even greater insight into the daily activities of your fleet using the combination of Geotab and Actsoft. Geotab devices provide detailed data collection and seamless integration with our solutions; learn more about the ways your vehicles are being used daily with the power of this tandem.
 Our partnership with Uniden is ideal for companies looking to gain advanced diagnostics on their fleets. Uniden’s extensive product listing of car electronics like radios, dash cams, radar detectors, and in-vehicle communicators work in concert with Actsoft’s solutions to better connect your vehicles to the company headquarters.
 Kyocera offers a wide range of mobile devices, ranging in design from traditional phones to ultra-durable handset technology. Actsoft is able to equip organizations in a variety of different industries with solutions for improved business, while Kyocera supplies the technology they can flawlessly operate on.

 Motorola’s mobile technology works in tandem with our solutions to provide extra versatility to your business practices. Coupled with our software’s features, Motorola’s reliable devices make connecting your workforce simpler than ever to do.
 Actsoft and Sanyo teamed up to merge intuitive business management software with the technology of today. This partnership allows us to provide you with all the tools your team needs for improved workflows, better coordination, and optimized productivity.
 We’re able to bundle certain solutions of ours (including our Electronic Visit Verification options) with Samsung devices to help your team achieve as much functionality as possible, while keeping rates affordable. Use these combinations for accurate recordkeeping, improved communication, and smarter data collection in the field.
 Our software is the perfect complement to Apple’s user-friendly technology. Equip your workforce with the devices and solutions it needs for optimized productivity during daily operations with Apple and Actsoft.