|
Let's Show You AroundRequest A Demo
|
Construction companies from every vertical and sub-trade rely on AnchoRock’s powerful safety management software. With automated solutions, any-device accessibility, and detailed reporting capabilities, AnchoRock helps construction companies digitize their safety programs and automate daily field tasks from the job site, the office, or anywhere in between.
AnchoRock makes it easy to manage your safety and compliance program from any device, all within our easy-to-use app. including:
If your construction company is still reliant on printouts and PDFs for certification tracking and reporting,it’s time to bring your safety management into the 21st century.Complete every field safety requirement and maintain all OSHA compliance and record keeping without ever skipping a beat. Keep your program lean and above-board without a thought.
No triple clicking or settings hide-and-seek. Just a single dashboard to create, manage, submit, report, log, edit, or distribute anything related to your safety program.
The Employee Wellness program offered by Actsoft is geared towards allowing companies to resume their normal business practices by doing so in a safe and cautious manner. With Prebuilt digital forms for returning to work, contact tracing, contactless delivery verification, and Persons Under Investigation, the Employee Wellness Program equips your organization with the documents needed to effectively monitor employee health prior to returning back to the workplace.
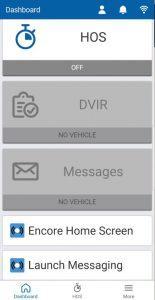
 Encore & Geotab Drive
Integrations between Encore and Geotab Drive:
• Encore Launch Screen
-From the press of a button in Geotab Drive, get taken to the Encore main menu.
• Encore Messaging Launch
-Switch directly to Encore’s Intra-Company Messaging feature from Geotab Drive.
• Encore Orders Launch
-Move from within Geotab Drive to the Job Dispatching module in Encore.
• Encore Timekeeping Launch
-Change to Encore’s Timekeeping module from the Geotab Drive dashboard.
Traverse ERP Software can help your employees collaborate more effectively with customers, vendors, executives, banks, and more. Connect all your departments to one integrated source of data that provides accurate information to stakeholders as needed. Your employees get things done easily with real-time, relevant, and integrated business knowledge. The comprehensive, award-winning feature set meets the needs of the entire organization, making Traverse an ideal solution to unify your departments under one integrated ERP System.
With our open API’s you can integrate data coming from Traverse to the system or from the system back to Traverse in order to streamline or automate processes.
Paylocity offers a wide range of options for payroll, human resources, time and labor, benefit admin technology, talent management, and engagement — all accessible from a mobile device. Streamline your payroll process by exporting Timekeeping information into payroll solutions. Through API’s, time information can be sent to record clock in and out, breaks and lunches.
Noise Cancelling Headphones
Every word gets heard, anywhere you go, take advantage of the industry’s leading technolgy in noise canceling headsets.
Blueparrott always delivers impressive sound quality for your calls and music, no matter how much noise your working environment throws at you.
• Up to 24 hours of talk time
• Blocks out 96% of background noise
• Streams Music, Multi media, GPS directions
• Roam up to 300ft from paired Bluetooth devices
Enterprises face challenges keeping data secure, processes compliant and teams aligned when files are scattered across various system components.
That’s where Box comes in.
With Box, you can manage, secure and share content for all your internal and external collaboration and processes in a single location. Files and reports can be sent to Box folders allowing access as needed.
Store your collected data into a central repository for form submissions, reports, or work orders – accessible from anywhere you have an internet connection.
Google drive allows users to store and synchronize files across devices.
Although Google drive is designed to function with the applications in G-Suite, it can also integrate with many other applications through the Chrome Web Store, as extensions in the browser.
Dynamics 365 revolutionizes CRM and ERP by applying intelligence to all forms of data. This enables organizations to evolve from reactive business decisions to proactive insights that empower their employees to accelerate business results. With our open API’s you can integrate data coming from Dynamics to the system or from the system back to Dynamics in order to streamline or automate processes.
Oops! We could not locate your form.
Oops! We could not locate your form.
Oops! We could not locate your form.


 Actsoft partnered with Odin to provide our solutions overseas, through payment processing integrations. Odin helps us support user management for our software; customers can also purchase our products through Odin’s billing platform.

 VisTracks powers our Electronic Logging Device (ELD) solution, which enables transportation businesses to easily automate their hours of service logs, remain in governmental compliance, and reduce their potential to incur costly fines.
 Integration between Actsoft solutions and BeWhere’s software products is available. Take your team’s asset tracking, cellular data connectivity, and field insight a step further with effective, cross-application compatibility.
 CalAmp tracking devices for vehicles and assets alike are compatible with Actsoft solutions, making it easy for you to efficiently monitor your equipment and fleet cars. Help your team enhance accountability, safety, and savings through a combination of easily installed hardware and intuitive software.
 Our partnership with Uniden is ideal for companies looking to gain advanced diagnostics on their fleets. Uniden’s extensive product listing of car electronics like radios, dash cams, radar detectors, and in-vehicle communicators work in concert with Actsoft’s solutions to better connect your vehicles to the company headquarters.
 Kyocera offers a wide range of mobile devices, ranging in design from traditional phones to ultra-durable handset technology. Actsoft is able to equip organizations in a variety of different industries with solutions for improved business, while Kyocera supplies the technology they can flawlessly operate on.

 Our software is the perfect complement to Apple’s user-friendly technology. Equip your workforce with the devices and solutions it needs for optimized productivity during daily operations with Apple and Actsoft.
 Actsoft and Sanyo teamed up to merge intuitive business management software with the technology of today. This partnership allows us to provide you with all the tools your team needs for improved workflows, better coordination, and optimized productivity.
 Motorola’s mobile technology works in tandem with our solutions to provide extra versatility to your business practices. Coupled with our software’s features, Motorola’s reliable devices make connecting your workforce simpler than ever to do.
 We’re able to bundle certain solutions of ours (including our Electronic Visit Verification options) with Samsung devices to help your team achieve as much functionality as possible, while keeping rates affordable. Use these combinations for accurate recordkeeping, improved communication, and smarter data collection in the field.
Oops! We could not locate your form.
Oops! We could not locate your form.
Oops! We could not locate your form.
Oops! We could not locate your form.


